DIY Electric Moving Tail: Step-by-Step Cosplay Guide
DIY Electric Moving Tail: Step-by-Step Cosplay Guide
Pre-made animatronic tails often come with a hefty price tag, typically ranging from $200 to $500. This expense can be a significant barrier for many cosplayers and makers. You dream of a dynamic, moving tail for your next convention, but the cost feels out of reach.
Many online tutorials offer glimpses into building these props, yet they often lack comprehensive, up-to-date guidance. They might skip crucial details, use outdated technology, or neglect modern maker techniques. This leaves aspiring creators feeling frustrated and without a clear path forward.
This guide provides a complete, modern solution for crafting your own electric moving tail. We cover essential DIY builds, including 2025 updates like Arduino integration, 3D printing techniques, and sustainable material choices. You don’t need a robotics degree to build this tail—just some patience, a soldering iron, and this guide.
Our approach draws from insights within the vibrant maker and cosplay communities, referencing conventions like Anthrocon where innovation thrives. By the end of this guide, you’ll have your own custom, moving cosplay tail built at a fraction of the price. This article walks you through planning, building, customizing, and understanding future trends.
Building your own electric moving tail is more than just a cost-saving measure; it's an opportunity to truly personalize your cosplay and connect with the innovative spirit of the maker community. Break free from limitations and craft something uniquely yours.
Why Build Your Own Electric Moving Tail?
Building your own electric moving tail addresses several key pain points for cosplayers and makers. High costs, limited creative options, and a desire for unique props often motivate a DIY approach. Opting for a handmade solution transforms these challenges into opportunities for innovation.
Cost Savings That Matter
Pre-made animatronic tails from specialty vendors can quickly drain your cosplay budget. Many creators report saving upwards of 70% by building their own. For example, a cosplayer aiming for a realistic fox tail might pay $350 for a professional version, but can build an equally impressive one for less than $100 in parts.
This significant difference allows you to allocate resources to other parts of your costume. It’s a smart financial decision that empowers more ambitious cosplay projects. Think of it as investing in skills, not just a product.
Unleash Creative Freedom & Customization
The true magic of DIY lies in complete creative control. You're not limited to mass-produced designs or color palettes. Every aspect, from the tail's shape and movement pattern to its fur texture and special effects, becomes your canvas. This means your prop perfectly matches your unique vision.
This level of personalization helps your cosplay stand out at conventions. You can integrate unique elements, such as specific character traits or personal artistic flourishes. It is an opportunity to tell a deeper story with your costume.
Embrace Sustainability and Modern Maker Culture
The modern maker movement increasingly values sustainable practices. Building your own tail allows for conscious material choices, from ethically sourced faux fur to recyclable 3D printing filaments. This reduces waste and supports eco-friendly cosplay.
Choosing to build also fosters a deeper connection with the maker community. You become part of a movement that prioritizes learning, sharing, and creating with purpose. This approach goes beyond just cost-saving, aligning with a broader ethos of conscious creation. It's about building a prop and also building a better making practice.
Tools, Materials, and Tech You’ll Need (2025 Edition)
The right tools and materials are crucial for a successful DIY electric tail project. Many makers feel overwhelmed by the technical components, fearing they need advanced robotics knowledge. This section demystifies the essential gear, focusing on affordability and modern applicability.
Core Structural Components: The Tail's Skeleton
The tail's internal structure dictates its movement and durability. Lightweight yet rigid materials are key. Most builders opt for a segmented spine, often using PVC tubing, sturdy wire, or 3D-printed links.
- Lightweight Foam: EVA foam or craft foam provides padding and bulk without adding excessive weight. It's easy to cut and shape.
- Sturdy Wire/PVC: A flexible yet firm internal spine, often made from insulated electrical wire (12-14 gauge) or thin PVC pipe sections, gives the tail its fundamental shape. This structure needs to withstand constant motion.
- 3D-Printed Brackets & Links: A 3D printer opens up many possibilities for custom servo mounts, articulation points, and spine segments. PLA or PETG filaments are excellent choices for their strength and ease of printing. Many free designs are available on platforms like Thingiverse.
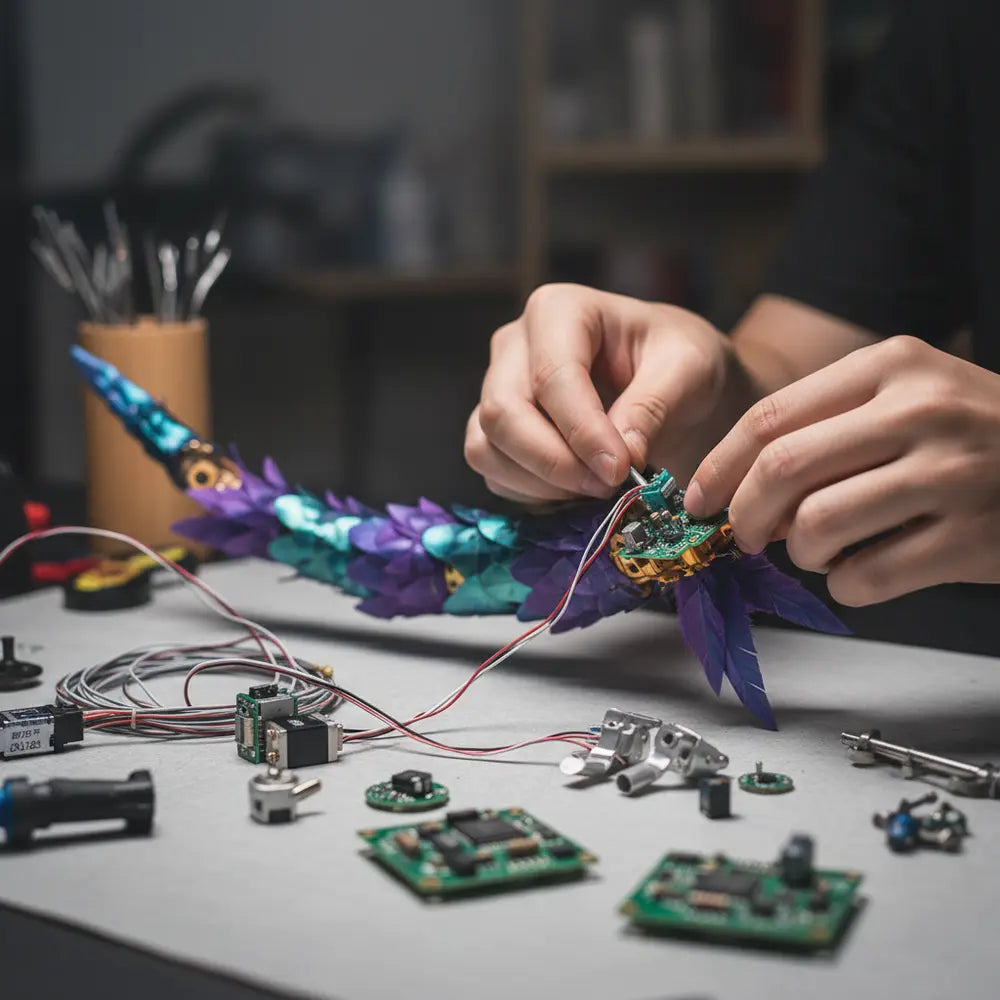
Essential Electronics: Bringing Movement to Life
The electronic components are the brain and muscle of your animatronic tail. Don't let terms like "Arduino" intimidate you; they are surprisingly user-friendly. Starting with a basic setup is perfectly achievable.
- Arduino Nano: This compact microcontroller is the workhorse for processing commands and controlling servo motors. It's powerful enough for complex movements yet small enough to hide in your costume. Expect to pay around $10-$15 for a genuine board.
- Servo Motors: These are the muscles of your tail. Micro servos (like SG90 or MG90S) are ideal for smaller, lighter tails, offering good torque for their size. Larger tails might require standard-size servos. A basic tail might use 2-4 servos.
- Rechargeable Battery Pack: A 7.4V LiPo battery (1000-2000mAh) provides ample power for several hours of operation. Always use a battery management system (BMS) or a dedicated LiPo charger for safety.
- Jumper Wires & Breadboard: Essential for connecting components during testing.
- Soldering Iron & Solder: For permanent, reliable connections.
- Remote Control (Optional): A simple 2-channel RC remote can offer basic wagging or specific gestures. Advanced users might integrate Bluetooth modules for smartphone control.
Crafting the Exterior: The Fur & Fabric
The outer layer brings your tail to life visually. Quality materials make a significant difference in realism.
- Faux Fur: High-quality faux fur is essential for a realistic look. Look for varieties with varying pile lengths and soft textures. Specialty fabric stores or online suppliers offer a wide range of colors.
- Fabric Shears: Sharp shears are crucial for cutting faux fur cleanly, minimizing shedding.
- Strong Adhesive: Fabric glue or hot glue for securing fur to the armature.
Optional Upgrades for Advanced Movement
Once comfortable with the basics, consider these upgrades for a truly dynamic tail. These enhancements can set your tail apart from simpler builds, adding layers of interactivity.
- Bluetooth Control: Sync your tail to a smartphone app for custom movement profiles. This offers unmatched flexibility.
- Motion Sensors (Accelerometer/Gyroscope): Allow the tail to react to your body's movement. Imagine a wolf tail responding to a sudden turn. For a stunning example of what's possible, explore the impressive capabilities of our Dynamic Electric Wolf Tail - Cosplay & Fashion Motion product, showcasing striking realism and advanced motion. This adds an organic feel.
- AI-Based Gestures: Advanced Arduino or Raspberry Pi builds can interpret complex gestures or even sound cues, triggering specific tail animations. This is a burgeoning area in wearable robotics.
- LED Integration: Small, addressable LEDs (like Neopixels) can be woven into the fur for glowing effects, especially striking for dragon or fantasy creature tails.
For a basic build, expect to spend around $50-$100 on electronics and core materials. This is a fraction of the cost of a pre-made item.
Your Interactive DIY Tail Material Checklist
Stay organized and ensure you have everything before starting your build! Check off items as you gather them for your electric moving tail project.
Planning Your Tail Design
Effective planning is the cornerstone of any successful DIY project. Many new builders jump straight into construction, only to encounter issues with weight, balance, or movement later. This section guides you through the critical design phase.
Choosing Your Animal Inspiration
The type of animal tail you design profoundly impacts its structure and movement. Will it be a sleek cat tail, a bushy fox tail, or a powerful dragon tail? Each has unique requirements.
- Cat Tails: Typically thinner, more flexible, and capable of subtle, fluid movements. They often require fewer servos but precise control. Consider a design that naturally mimics the elegant curve of a feline's spine.
- Fox Tails: Bushier and often held with a slight curl. They require a stronger internal armature to support the fur's weight and might use more powerful servos for a convincing wag. For inspiration on common styles and the widespread appeal of fox tails in the cosplay scene, review our comprehensive guide: From Anime Con to Everyday: Why Fox Tails Are Trending.
- Wolf Tails: Often longer, thicker, and capable of more expressive, powerful movements. These might benefit from a multi-segment design with more articulation points. The impressive design of products like the Dynamic Electric Wolf Tail - Cosplay & Fashion Motion clearly shows the potential for striking realism and intricate movement patterns you can achieve.
- Dragon Tails: Can be highly varied, often featuring spikes, scales, or elaborate shapes. These demand a robust internal structure and multiple servos for complex, serpentine movements.
Balancing Realism with Comfort and Weight
A realistic-looking tail is fantastic, but it must also be comfortable to wear for extended periods. This balance is often overlooked in early design. A tail that’s too heavy will cause discomfort and fatigue.
Aim for a total weight under 2-3 pounds for smaller tails, and under 5 pounds for larger, more elaborate ones. Test the weight distribution by mock-wearing a weighted prototype around your waist. Consider how the tail attaches to your costume; a secure, weight-distributing harness is vital.
Sketching Tail Movement Range Before Building
Visualizing your tail's motion is crucial. Before cutting any materials, sketch out its potential movement patterns. Think about how the tail will interact with your body and the environment. What story does its movement tell?
- Movement Arcs: How wide will it wag? Will it curl upwards or downwards?
- Speed Variations: Can it perform a slow sway, a quick flick, or a sharp twitch?
- Articulation Points: Mark where the tail will bend. These points will correspond to your servo placements.
- Dynamic Poses: How will it look at rest? How will it look when your character is excited or cautious?
This sketching phase helps you identify potential mechanical limitations early. It prevents costly mistakes and ensures your final tail performs exactly as envisioned. A well-planned tail is a tail that truly enhances your cosplay.
Customization and Personalization
Once your tail's core mechanics are functioning, the real fun of personalization begins. Many crafters worry their DIY tail might look too "homemade" compared to store-bought options. This section offers ideas to elevate your tail's aesthetic and integrate it seamlessly into your costume.
Adding Dynamic Elements: LEDs and Sound
Integrating lights and sounds can dramatically enhance your tail's impact. Small, addressable LED strips (like WS2812B Neopixels) can be woven beneath the fur. These can be programmed with specific patterns, colors, or even triggered by tail movements. Imagine a dragon tail that glows with a fiery pulse.
Sound modules, though more complex, can add growls, hisses, or whimsical chirps synchronized with tail motions. This creates a multi-sensory experience for your audience. For example, a fox tail could emit a subtle bark with an excited wag.
Mastering Fur Dyeing and Texture Options
The quality and appearance of your faux fur are paramount. Don't limit yourself to off-the-shelf colors. High-quality faux fur can be carefully dyed using acrylic paints diluted with fabric medium or specialized fabric dyes. This allows for intricate gradients or unique patterns that perfectly match your character.
Experiment with different fur pile lengths and textures. Layering a long-pile fur over a shorter one creates depth and realism. Brushing and trimming the fur after attachment can sculpt its shape and enhance its flow. Ethical fur options are also increasingly available, aligning with sustainable cosplay values.
Integrating with Different Cosplay Costumes
A standalone moving tail is impressive, but a tail seamlessly integrated into a larger costume is transformative. Consider how the tail attaches and appears to flow from the character. A well-designed harness hidden beneath clothing ensures comfort and stability.
For example, to truly elevate your costume, observe how a meticulously crafted piece like the Dynamic Red Fox Moving Tail for Cosplay & Fashion inspires designs with hidden attachment points. This creates the illusion that the tail is a natural extension of your character's body. Think about how the fur texture and color complement the rest of your outfit. A truly integrated tail elevates the entire cosplay, turning a prop into a natural extension of your character's persona.
Trends and Future of Cosplay Tails (2025 and Beyond)
The world of wearable robotics and cosplay is rapidly evolving. Many makers wonder how to future-proof their builds and incorporate the latest innovations. This section explores cutting-edge trends, ensuring your DIY tail remains at the forefront of animatronic artistry.
AI-Gesture Controls and Bluetooth Syncing
The future of cosplay tails points towards increasingly intuitive and responsive controls. AI-gesture recognition, using on-board accelerometers or even small cameras, allows the tail to respond to your body language. Imagine a tail that subtly wags faster when you lean forward or droops when you slump. This creates a deeply immersive experience.
Bluetooth syncing with smartphone apps offers unparalleled control and customization. Users can create custom movement profiles, adjust speed, and trigger specific animations with a tap. This offers dynamic control far beyond traditional remote-control systems.
Rise of Sustainable Cosplay Materials
The push for sustainability is reshaping the maker community. By 2025, expect to see an even greater emphasis on eco-friendly materials for cosplay props. This includes 3D printing with recycled filaments (rPETG, rPLA) and using sustainable, plant-based foams. Makers are actively seeking ways to reduce their environmental footprint.
The shift extends to faux fur production, with a growing demand for ethically sourced and recycled fabric alternatives. Choosing durable, repairable components also contributes to a longer lifespan for your props. This means less waste and a more responsible approach to crafting.
Predictions for 2025 Furry Convention Props
Furry conventions like Anthrocon are hotbeds of animatronic innovation. For 2025, we predict a surge in tails featuring hyper-realistic, yet expressive, movements. Expect more intricate servo-driven systems allowing for subtle twitches and emotive poses. The focus will be on natural, fluid motion.
Beyond movement, multi-sensory integration will become more common. This includes haptic feedback to the wearer, synchronized sound effects, and interactive LED patterns. The goal is to create props that feel alive and respond dynamically to the wearer's actions. We also anticipate continued exploration of motion-sensing technologies, similar to the adorable tech discussed in our article, From Cute to Clever: What Are Moving Cat Ears?, allowing tails to respond organically to the wearer's movements and emotions.
Safety First: Essential Considerations for Wearable Robotics
Building an electric moving tail is a rewarding project, but safety must always be paramount. Many creators, eager to see their vision come to life, might overlook crucial safety measures. This section ensures your wearable robotics project is not only impressive but also secure and comfortable to use.
Electrical Safety: Protecting Yourself and Your Project
Working with electronics carries inherent risks. Always prioritize electrical safety to prevent shorts, fires, or injury. Double-check all wiring connections for proper polarity.
- Insulate Connections: Use heat shrink tubing or electrical tape on all soldered joints. Exposed wires are a hazard.
- Fuse Protection: Integrate a small fuse (e.g., 2A or 3A) into your battery circuit. This protects your components and battery from overcurrents.
- Battery Management: Use a dedicated LiPo charger for LiPo batteries. Never overcharge or short-circuit LiPo batteries; they can be volatile.
- Component Ratings: Ensure all components (motors, wires, switches) are rated for the voltage and current your battery supplies.
Weight Distribution and Ergonomics
A poorly balanced tail can cause discomfort, strain, or even injury during prolonged wear. Proper weight distribution is essential for a comfortable and enjoyable cosplay experience. Distribute heavier components, like batteries, as close to your body as possible.
Consider adding counterweights at the base of the tail near the attachment point if the tip is too heavy. A well-designed harness that distributes weight across your hips or shoulders, rather than just your waist, makes a significant difference. Test the tail's comfort during design and adjust as needed.
Securing the Tail: Attachment Methods
How your tail attaches to your body or costume is critical for both security and comfort. A robust attachment system prevents the tail from flopping or detaching during movement. Many cosplayers use a sturdy belt or harness.
- Integrated Belt Loops: Build strong fabric loops directly into the tail base. These slide onto a heavy-duty belt.
- Plate Mount: Create a rigid plate (e.g., from ABS plastic or aluminum) that sits against your lower back. This plate can then be bolted or strapped securely to a harness.
- Quick Release: For safety, especially in crowded convention spaces, consider a quick-release mechanism. This allows you to quickly detach the tail if it gets snagged or becomes a hindrance.
Maintenance and Durability for Longevity
Regular maintenance ensures your electric tail lasts for many conventions to come. Treat your animatronic prop as you would any other piece of electronics. Durability starts with solid construction.
- Inspect Wiring: Before each use, visually inspect all wiring for frayed insulation or loose connections.
- Test Motors: Ensure all servos are operating smoothly and without excessive noise. Lubricate moving parts if necessary.
- Clean Fur: Gently brush and clean the faux fur to remove dirt and debris. Avoid getting electronics wet.
- Charge Batteries Safely: Always store LiPo batteries in a fire-retardant bag and charge them in a safe area.
By adhering to these safety guidelines, your DIY electric moving tail will be a show-stopping, safe, and reliable addition to your cosplay arsenal.
Conclusion
Building your own DIY electric moving tail offers unparalleled rewards, transforming common cosplay challenges into triumphant successes. You’ve now gained insights into significantly reducing costs, achieving complete creative control, and embracing sustainable maker practices. This guide has equipped you with the knowledge to craft a unique, dynamic prop, from selecting the right tools to understanding future trends.
Your journey into wearable robotics is just beginning. We encourage you to share your unique creations within the vibrant maker community and on social media. Each DIY project inspires others to explore their own creative potential.
Ready to bring your tail to life with precision? Get started today!
(Click to instantly download a detailed, step-by-step guide for your build in .txt format.)
For deeper exploration into animatronic cosplay, consider these resources:
- Fox Tail Inspiration: Delve into the cultural impact and design trends of animatronic fox tails with our insightful article, From Anime Con to Everyday: Why Fox Tails Are Trending.
- Moving Accessory Tech: Understand the charming engineering behind other popular moving accessories in From Cute to Clever: What Are Moving Cat Ears?
Want More Cutting-Edge Cosplay Tech and Maker Tutorials?
Join our community of innovative makers and get the latest guides, tips, and product updates delivered straight to your inbox.
Subscribe for Cosplay Maker Updates!FAQ
Q: How long does it typically take to build a DIY electric moving tail?
A: A basic electric tail can be built in a weekend with focused effort, typically 15-20 hours of work. More complex designs with advanced features like AI-gesture controls or intricate fur work might take several weeks. Planning and testing also add to the overall timeline.
Q: What's the most challenging part of making an animatronic cosplay tail for beginners?
A: For many beginners, basic Arduino programming and soldering can be the most challenging. However, there are abundant online tutorials and beginner-friendly code examples available. Start with simple movement patterns before attempting complex sequences.
Q: Can a DIY electric moving tail be used with any cosplay costume?
A: Yes, with careful planning. The tail’s attachment mechanism needs to be compatible with your costume’s structure. Many builders integrate a strong, hidden harness. The tail's fur and movement style should also complement your character's aesthetic for a cohesive look.
Q: How do I make my DIY electric tail's movement more realistic?
A: Realistic movement comes from thoughtful design and programming. Use multiple servos for smoother articulation, experiment with varying speeds (slow sway, quick flick), and incorporate pauses. Observing real animal movements helps in programming authentic gestures.
Q: Are there more affordable options than 3D printing for tail components?
A: Absolutely. While 3D printing offers precision, you can achieve excellent results with traditional methods. Craft foam, PVC pipe, and sturdy wire can form the internal armature. Hand-cut and shaped plastic sheets or even cardboard can serve as servo brackets in a pinch.