DIY Personalized Moving Cosplay Ears Guide
Ever admired a cosplay where the ears twitch and react, bringing the character to life in a way static props never could? You might have wondered if that level of detail was reserved for pros with huge budgets. It's a common feeling in the cosplay community—wanting that extra magic but feeling stuck.
This guide is your cosplay workshop buddy. We're here to show you that creating or owning a pair of personalized moving cosplay ears is more accessible than you think. You’ll get a transparent look at the costs, skills, and time involved, whether you choose to build your own or buy a pre-made set.
Our goal is to empower you with the knowledge to make the right choice for your project. By the end, you'll understand how to create a unique, expressive accessory that elevates your cosplay from great to unforgettable, all while respecting your budget and skill level.
Why Animatronic Cosplay Ears Are Trending
Have you noticed more and more cosplayers with ears that twitch, pivot, and fold at conventions? This section unpacks the rapid rise of animatronic accessories and explains why they've become a new benchmark for creating truly immersive character experiences.
The difference between a good cosplay and a breathtaking one often lies in the details. DIY animatronic ears and their pre-made counterparts are surging in popularity at events like Anime Expo, Comic-Con, and furry conventions for one simple reason: they add life.
Imagine an Ahri from League of Legends whose ears perk up in response to a sound, or a Judy Hopps from Zootopia whose ears droop inquisitively. This dynamic movement creates a powerful connection with observers, making the character feel present and real. Just a few years ago, this tech was expensive and obscure, but now it's within reach for many hobbyists.
This trend is also driven by the desire for deep personalization. Cosplayers are no longer limited to static props. Now, they can program movements, integrate lights, and perfectly match colors, making their interpretation of a character completely unique. The technology behind this is fascinating, and if you're curious about the specific mechanics that make it all possible, our detailed article explains exactly what moving cat ears are and reveals the clever engineering inside.
DIY vs Pre-Made: Which Path is Right for You?
Are you torn between the satisfaction of building your own gear and the convenience of a ready-to-wear solution? Here, we provide a clear, side-by-side comparison of cost, time, and customization to help you decide which path aligns with your budget and cosplay goals.
Choosing between a DIY project and a pre-made product is a core decision for any maker. There's no single right answer, only what's right for you. Let's break down the key factors to consider.
Interactive Cost & Time Estimator
Your Estimated Investment:
Starting with a DIY project, expect a cost around $60 and a weekend of rewarding work.
Cost Breakdown
The most immediate difference is price. Building your own is almost always cheaper in terms of direct cost.
- DIY Kit: A basic kit with servos, a controller, and wiring can cost around $60. This gives you the core mechanics to get started.
- Pre-Made Model: A quality, entry-level pre-made set typically starts around $120. You're paying for convenience and polished assembly.
- .Professional Commission: A fully custom set from a specialized artist can range from $300 to over $500, depending on complexity.
Time and Skill Investment
A common misconception is that DIY is always a massive time sink. While it requires more effort than opening a box, the learning process is part of the fun for many hobbyists. A DIY build could take a weekend of focused effort, including assembly, coding, and cosmetic work.
In contrast, a pre-made set is ready in minutes. The real question is: do you enjoy the process of making? If tinkering with electronics and code sounds exciting, DIY is a rewarding path. If you'd rather focus on other parts of your cosplay, pre-made is the logical choice.
Customization Flexibility
This is where DIY truly shines. When you build it yourself, you control everything. You can 3D print a unique shape, choose the exact fur for your custom color cosplay ears, and program specific movement patterns. Pre-made options offer some variety, but you're ultimately limited to the manufacturer's designs.
To find the most reliable and convention-ready pre-made options, our definitive guide to the Best Animatronic Cosplay Ears of 2025 offers direct comparisons and expert-vetted recommendations.
Essential Tools and Materials for DIY Builds
Ready to roll up your sleeves but unsure what to gather for your workbench? This section lists the essential electronic components and cosmetic materials you'll need for a successful build, along with crucial safety reminders.
Assembling your own set of personalized moving cosplay ears is a project that merges electronics with artistry. Having the right tools and materials on hand from the start makes the process smooth and enjoyable. Think of it as gathering your ingredients before you start cooking.

Electronics Basics
These are the "brains and muscles" of your project.
- Micro-Servos: Small motors like the SG90 are the standard choice. You'll need at least two—one for each ear—to create movement.
- Microcontroller: This is the brain. An Arduino Nano or a similar small board is perfect for beginners. It's where you'll upload code to control the servos.
- Power Source: A small 3.7V or 5V LiPo battery is ideal for portability. You'll also need a corresponding charging circuit to manage it safely.
- Wires and a Breadboard: Jumper wires and a breadboard allow you to test your circuit without any permanent soldering.
Cosmetic Materials
This is how you bring the ears to life visually.
- Ear Structure: You can use craft foam (like EVA foam) to build the base shape or 3D printed robotic cosplay ears if you have access to a printer.
- Faux Fur: The key to a realistic or cute look. Choose a color and pile length that matches your character.
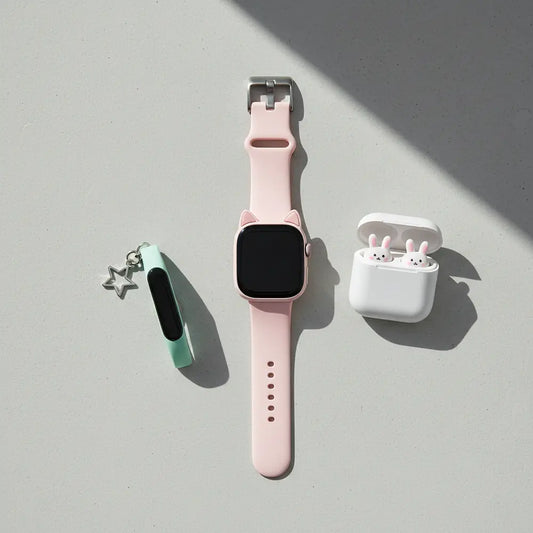
- Paints and Dyes: Acrylic paints or fabric dyes are essential for achieving custom color cosplay ears. An airbrush can create beautiful, smooth gradients.
Safety Considerations
Don't skip this part! Always use a proper stand for your soldering iron to prevent burns. When working with LiPo batteries, never puncture them and use a designated charger. If you're painting or using adhesives, work in a well-ventilated area to avoid inhaling fumes.
Step-by-Step DIY Guide: Building Moving Cosplay Ears
Does the thought of wiring and code feel a little overwhelming? Follow this straightforward guide to assemble, customize, and program your own DIY animatronic ears, breaking down the process into manageable steps.
Building your own animatronic ears is a journey in three main parts: building the skeleton, giving it a skin, and teaching it how to move. Let's walk through it. For those who want a truly in-depth guide with wiring diagrams and advanced tips, our comprehensive DIY Moving Cat Ears Tutorial for Cosplay provides a complete visual walkthrough.

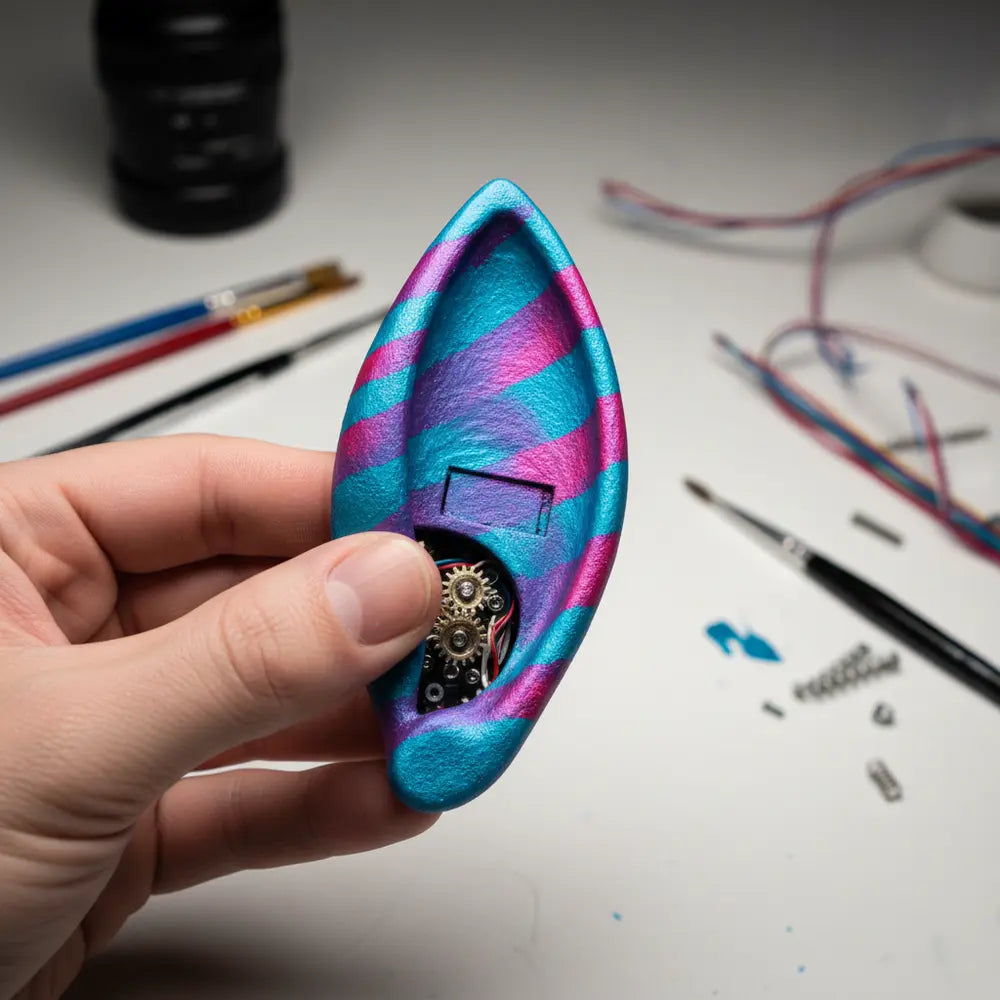
1. Assembling the Circuit
This is the technical heart of your project. The goal is to connect your servos to the microcontroller so it can send them signals.
First, identify the three wires on your servo: Signal (often orange or yellow), Power/VCC (red), and Ground/GND (brown or black). Connect the Power and Ground wires to the 5V and GND pins on your Arduino, respectively. Connect the Signal wire to one of the digital pins (e.g., D9).
2. Crafting and Customizing the Ear Shells
Now for the creative part. You need a lightweight structure to mount your servos and attach the fur. Many makers use high-density EVA foam, carving it into the desired shape and hollowing it out to fit the electronics.
Alternatively, you can find and modify 3D print files for 3D printed robotic cosplay ears. Once your base structure is ready, attach the servo, ensuring it has a full range of motion. Then, carefully wrap the ear in your chosen faux fur.
For custom color cosplay ears, this is your moment to shine. You can use an airbrush with acrylic paint to add gradients, spots, or stripes directly onto the fur. Start with a light-colored fur for the most vibrant results. The difference between a plain white ear and one with a custom pink inner gradient is stunning.
3. Programming Basic Movements
This step brings your creation to life. Don't worry if you've never coded before; the Arduino platform is designed for beginners.
Using the Arduino IDE (a free software), you'll write a simple script. You'll need to include the Servo library, which makes controlling servos incredibly easy. A basic "twitch" can be programmed by telling the servo to move to one position, wait a fraction of a second, and then return.
For example, a simple command might be `earServo.write(90);` to set the ear upright, and `earServo.write(120);` to make it twitch outward. By creating functions for different movements (e.g., `twitch`, `perkUp`, `droop`), you can build a library of expressions for your programmable robotic cosplay ears.
Download Your Free Build ChecklistTop-Rated Models and Kits in 2025
Prefer the plug-and-play approach but want to make sure you're getting the best gear? This section highlights the top-rated pre-made models and kits of 2025, covering everything from simple, remote-controlled options to advanced, app-enabled ears.
If the DIY route isn't for you, the market for pre-made animatronic cosplay ears has never been better. Manufacturers have developed options for every skill level and budget, focusing on durability, ease of use, and advanced features.
Best Beginner-Friendly Options
For those new to animatronics, simplicity is key. Look for models that are controlled by a small, handheld remote. These sets are often powered by a simple battery pack hidden in your wig or costume. They come pre-programmed with a few basic movements like twitching and wiggling, making them perfect for your first reactive cosplay.
A great starter set prioritizes robust construction over complex features. You want something that can survive a crowded convention hall. Expect to find reliable options in the $120-$180 price range.
Advanced Programmable Models
Ready for more control? Programmable robotic cosplay ears are the next level up. These models often connect to a smartphone app via Bluetooth. The app allows you to create and save custom movement sequences, adjust the speed and range of motion, and even set the ears to react to your phone's gyroscope.
This means your ears can automatically droop when you look down or perk up when you tilt your head. This level of interactivity is what truly sells the illusion of a living character.
Wireless and Bluetooth-Enabled Options
The ultimate in convenience and aesthetics is wireless moving cosplay ears. These models eliminate the final tether—the wire connecting the ears to the controller or battery pack. Each ear contains its own tiny battery and receiver, synchronized to work together.
This clean setup is ideal for photoshoots and cosplays with exposed necklines where hiding a wire would be difficult. While they are at the higher end of the price spectrum, the freedom they offer is unmatched.
For an expert-curated list and in-depth reviews of the latest models, the definitive guide is our regularly updated breakdown of the Best Animatronic Cosplay Ears 2025: Top Ranked Picks. It’s continuously refreshed to help you find the perfect set for your needs.
Customization Showcase: Colors, Shapes, and LEDs
Think you're limited to just cat or fox ears? Prepare to be inspired. This showcase reveals the endless creative potential of customization, from unique ear shapes to vibrant color schemes and eye-catching LED enhancements.
The true magic of this craft lies in making something that is uniquely yours. Whether you're building from scratch or modifying a pre-made set, customization is what will set your cosplay apart.

Beyond Cats and Foxes: A World of Shapes
While feline and canine ears are popular, the possibilities are limitless. You can design long, elegant ears for an elf or fairy character, rounded ears for a bear, or even scaly, angular horns for a dragon. Using foam or 3D printing, any shape you can imagine is possible. The core animatronic mechanism remains the same; only the cosmetic shell changes.
The trend of unique character accessories is rapidly expanding beyond the con floor. To understand how these items become fashion statements, read our fascinating analysis on why fox tails are trending as everyday accessories.
Mastering Custom Colors
Achieving the perfect custom color cosplay ears to match a wig or outfit is an art form. For light or pastel colors, starting with white faux fur is essential. You can then use fabric dye or an airbrush with thinned acrylic paint to add color.
Adding the Glow: LED Enhancements
For an extra "wow" factor, especially at evening events, consider adding LED light-up animatronic ears. Small, programmable LED strips like NeoPixels can be integrated into the ear structure. You can program them to glow, pulse, or change color, synchronizing the lights with the ear movements for a dazzling effect.
Imagine a futuristic android cosplay with ears that glow blue as they twitch, or a fantasy creature whose ears emit a soft, magical light. This addition takes your accessory from a prop to a special effect.
What Customization Matters Most To You?
Maintenance, Care, and Upgrades
You've built or bought your perfect ears. How do you ensure they last for many conventions to come? This section covers essential tips for battery management, material care, and planning future upgrades to keep your gear in top condition.
Your animatronic ears are a piece of functional art, and like any valuable gear, they require a bit of care to maintain their performance and appearance. Proper maintenance also paves the way for exciting future upgrades.
Battery Management
This is the most critical aspect of daily care, especially at a multi-day convention. Most wireless moving cosplay ears use rechargeable LiPo batteries. A common mistake is to let them drain completely, which can shorten their lifespan.
Material Upkeep and Storage
Faux fur can get dusty or flattened. Use a soft-bristled brush (like a pet brush) to gently fluff the fur and keep it looking neat. If you need to spot-clean, use a damp cloth with a tiny bit of mild soap, being careful not to soak the electronics underneath.
When you're not wearing them, store your ears on a wig head or a custom stand. This prevents them from being crushed in a bag, which can damage both the shape and the delicate mechanisms inside.
Future Upgrade Paths
Your first set of ears is just the beginning. As your skills grow, you can plan exciting upgrades. An excellent upgrade path is moving from a simple remote control to a motion sensor. By adding a small gyroscope and accelerometer, your ears can react automatically to your head movements.
For the truly ambitious, some makers have even integrated EEG brainwave sensors, allowing the ears to react to focus or relaxation levels. This is the pinnacle of immersive cosplay animatronic accessories.
Where to Buy Custom Ears or Kits
Ready to make a purchase but not sure where to look? This guide is your directory to the best online marketplaces, maker communities, and commission artists to find the perfect animatronic ears or DIY kits for your project.
Whether you're hunting for a starter kit or commissioning a high-end custom piece, knowing where to shop is key. The community around affordable cosplay gear and high-tech accessories is vibrant and full of talented creators.
Online Stores and Marketplaces
For pre-made models and some standardized kits, marketplaces like Etsy are a goldmine. You'll find dozens of artists and small businesses selling their unique designs. This is a great place to find custom color cosplay ears or sets with specific themes. Some specialized online cosplay prop shops also carry a curated selection of animatronic gear.
Maker Communities and Forums
If you're on the hunt for a DIY animatronic ears kit, maker-focused communities are your best bet. Websites like Tindie often feature kits designed and sold by fellow electronics hobbyists. Forums and Discord servers dedicated to cosplay or Arduino projects are also excellent places to ask for recommendations or find group buys.
Commissioning a Custom Artist
For a truly one-of-a-kind piece, commissioning an artist is the way to go. This involves finding a creator whose style you admire and working with them to design a set of ears from the ground up. You can specify the shape, color, fur type, and even the movement patterns.
You can find these artists by searching hashtags like `#cosplaycommission` or `#furears` on Instagram and Twitter. Be prepared for a higher cost and longer lead time, but the result is a piece of art tailored perfectly to your vision.
To simplify your search for trusted sellers and see which models are winning over cosplayers right now, the most reliable starting point is our guide to the Best Animatronic Cosplay Ears 2025. We've vetted the sources and highlighted the top performers to save you hours of research.
Your Next Move
You now have a clear map for adding expressive, moving ears to your next cosplay. The choice between DIY and pre-made comes down to your passion for the process versus the need for convenience. DIY offers unmatched customization and the deep satisfaction of making, while pre-made models deliver instant magic and professional polish.
If you're new to electronics, don't be afraid to start with an affordable DIY kit. It’s a fantastic way to learn the basics without a huge investment. As your confidence and skills grow, you can tackle more advanced projects or upgrade to a feature-rich programmable model. The journey is part of the adventure.
Ready to bring your character to life? Explore our curated collection of top-rated animatronic kits and pre-made ears. Or, subscribe to our newsletter for more expert cosplay tutorials, build guides, and trend showcases delivered right to your inbox.
Frequently Asked Questions
1. How much do DIY animatronic ears actually cost to make?
A basic set of DIY animatronic ears typically costs between $50 and $80. This covers the essential electronics like servos and a microcontroller, plus basic cosmetic materials like foam and faux fur. Costs can increase if you opt for more advanced components like Bluetooth modules or high-end 3D printed parts.
2. Can I make moving cosplay ears without any coding knowledge?
Yes, you can! Some DIY kits come with pre-programmed microcontrollers, so you only need to handle the assembly. Alternatively, you can find and download pre-written code for Arduino online. You would just need to upload it to your board without writing it from scratch.
3. How long do the batteries last in wireless moving cosplay ears?
On a full charge, a quality pair of wireless ears will typically last between 4 to 6 hours with moderate to active movement. Battery life depends on the size of the battery and how frequently the ears are moving. Most cosplayers bring a portable power bank for a quick recharge during a break.
4. What's the best way to get custom color cosplay ears to match my wig?
The most effective method is to start with white or light-colored faux fur and use an airbrush with fabric-safe acrylic paints. This allows you to blend colors precisely and create gradients. For a perfect match, have a small swatch of your wig hair with you when mixing your paints.