Seamless Cosplay Ears: DIY vs Store-Bought Guide
Seamless Cosplay Ears: DIY vs Store-Bought Guide
If you’ve ever scrolled through your convention photos only to see your elf ears betrayed by a visible headband, this guide is for you. That thin plastic line or bulky strap can instantly shatter the illusion you worked so hard to create. It’s a common frustration that separates good cosplay from truly immersive character transformations.
For dedicated cosplayers, details matter. Achieving realistic cosplay ears that appear to grow naturally from your head is a game-changer. It elevates your photos, boosts your confidence, and deepens your connection to the character. The good news is, a seamless look is more accessible than ever.
This guide is your complete toolkit for choosing the right path. We will compare the world of DIY cosplay ears without a headband against the convenience of store-bought options. We’ll break down the trade-offs in cost, comfort, realism, and durability, so you can make the best choice for your next project.
Why Headband-Free Cosplay Ears Matter
Ever wonder why some cosplays look so professional and cinematic? Often, it's the small, invisible details. This section explains why ditching the headband isn't just a preference—it's a critical step toward leveling up your craft.
The drive for headband-free ears goes beyond simple aesthetics; it’s about immersion. A visible strap immediately reminds the viewer (and you) that you’re wearing a costume. For competitive cosplayers, judges notice these details. A clunky headband can be the deciding factor between a winning presentation and an honorable mention, as it signals a lack of finish.
Comfort is another huge factor, especially during a long convention day. Headbands can cause pressure headaches, slip out of place, or get tangled in your wig. A seamless attachment method, whether glued or clipped, distributes weight differently and often feels much more secure and comfortable for 8+ hours of wear.
Ultimately, seamless cosplay ears enhance the magic. When your ears blend perfectly, you don't just look like the character—you feel more like them. This commitment to realism creates a powerful, believable effect that makes your cosplay memorable for both you and everyone who sees it.
DIY Cosplay Ears Without Headbands
Feeling crafty and want to create something perfectly unique to your character, but worried about the time and skill required? This chapter demystifies the DIY process, giving you a realistic look at the costs, effort, and rewards of making your own seamless ears.
Creating your own DIY cosplay ears without a headband offers ultimate control over shape, size, and color. It's a rewarding project for a cosplayer who values customization and is working with a tight budget.
Materials and Cost
You can get started for a surprisingly low initial investment. A basic DIY kit often costs less than $25.
- Sculpting Medium: A small block of oil-based, non-drying clay (like Monster Clay or plasticine) to create your ear shape.
- Casting Material: A plaster like Ultracal 30 to make a negative mold of your clay sculpture.
- Prosthetic Material: Liquid latex is the most common and affordable choice. For higher-end results, you might use skin-safe silicone.
- Tools & Extras: A basic sculpting tool set, baby powder (as a release agent), and acrylic paints for color.
A great example is the dedicated student cosplayer who can spend a weekend and about $20 in materials to craft a pair of ears. While it may take them over 8 hours of sculpting, casting, and painting, the result is a custom-fit piece they couldn't have bought off the shelf.
Basic Crafting Process
- 1Sculpt: On a flat surface, sculpt your desired ear shape out of oil-based clay. Pay close attention to creating a very thin, blendable edge where the prosthetic will meet your skin.
- 2Mold: Build a small box or wall around your clay sculpt and pour plaster over it to create a negative mold. Once the plaster is fully cured, you can remove the clay.
- 3Cast: Brush thin, even layers of liquid latex inside your plaster mold. Allow each layer to dry completely before adding the next. Build up 5-10 layers for a durable but flexible ear.
- 4Demold & Finish: Carefully peel the latex ear out of the mold. Dust it with translucent powder to remove any tackiness. You can now paint it with flexible acrylics or specialized makeup to match your skin tone.
Pros and Cons of the DIY Approach
Pros:
- Unmatched Customization: You control the exact shape, size, and texture.
- Cost-Effective: Materials are cheap, and you can make multiple pairs from one mold.
- Perfect Fit: You can sculpt the base to match the contour of your own ear for a better blend.
Cons:
- Time-Consuming: The process involves multiple steps with drying and curing times.
- Skill-Dependent: Your final result relies on your sculpting and painting abilities.
- Potential for Failure: First attempts can be messy, and molds can fail.
For those ready to tackle a more advanced project, the principles learned here can even be applied to more complex builds. If you're looking to elevate your crafting with electronics, our DIY Moving Cat Ears Tutorial for Cosplay is the ultimate resource for creating a truly show-stopping effect.
Store-Bought Seamless Ears: What’s Available in 2025
Feeling overwhelmed by the sheer volume of cosplay ears available online, from suspiciously cheap to shockingly expensive? We'll categorize the market for you, breaking down the key differences so you can shop smart and find the perfect match for your needs and budget.

If you value time and convenience over custom crafting, the market for store-bought ears is vast and varied. Understanding the different tiers can save you from a disappointing purchase. The main options fall into three categories: budget-friendly marketplace finds, artisan-crafted pieces, and professional-grade SFX prosthetics.
Etsy Handmade Options
Etsy is a fantastic source for unique, semi-custom ears. Many sellers are fellow cosplayers or small artists who create ears with more imaginative shapes and paint jobs than mass-produced versions.
- Pros: Unique designs, potential for custom color requests, supports independent artists.
- Cons: Quality can vary wildly between shops, and prices are often in the mid-range ($30-$60).
- Pro-Tip: Always read recent reviews and look at customer photos to gauge the real-world quality and how well the edges blend.
Amazon Affordable Picks
For cosplayers on a deadline or a strict budget, Amazon offers a massive selection of elf ear prosthetics. These are typically mass-produced from thicker latex and are a great entry point.
A common example is comparing a typical $15 Amazon latex ear to a more premium product. The Amazon ear will often have a thick, difficult-to-hide seam and a generic, flat skin tone. It works for a casual costume but can look obvious in close-up photos.
- Pros: Very affordable, fast shipping, wide variety of basic styles.
- Cons: Often made of thick, inflexible latex with poor blending edges. Generic colors require heavy makeup to match.
Premium SFX-Grade Prosthetics
Brands like Aradani Studios or Madhouse FX create prosthetics for the film and theatrical industries, and their products are available to cosplayers. These ears are made from high-quality latex or encapsulated silicone with paper-thin, meltable edges.
Contrast the $15 Amazon ear with a $75 professional prosthetic. The pro-grade ear is cast in a softer, more translucent material. Its edges are so thin they can be dissolved with acetone or blended seamlessly with liquid latex, creating a truly invisible transition from the prosthetic to your skin. For serious competitors or photoshoots, this is the gold standard.
Attachment Methods: Glue, Tape, or Wig Integration
You've finally found or made the perfect pair of ears, but how do you get them to stay on securely without a headband? This section covers the best attachment methods, from skin-safe adhesives to clever wig-hiding tricks, ensuring your ears stay put all day.
Choosing the right attachment method is just as important as the ears themselves. The best technique depends on your skin sensitivity, the weight of your ears, and how long you need them to stay on.
Best Adhesives for Cosplay Ears
Adhesive is the most common method for achieving a truly seamless attachment.
- Spirit Gum: The classic choice. It’s affordable and widely available. However, it can be harsh on sensitive skin and may lose its grip with sweat. It’s best for lightweight ears and short-term wear.
- Pros-Aide: A professional-grade, water-based medical adhesive. It’s much stronger than spirit gum, flexible, and more resistant to sweat. It's the go-to for all-day convention wear and heavier prosthetics.
- Telesis or Silicone Adhesives: These are top-tier SFX glues. They offer the strongest, most durable bond but are also the most expensive and require a special remover.
Pro-Tip: Always perform a patch test on your skin 24 hours before your event to check for any allergic reaction to an adhesive.
How to Attach Ears Without Glue
If you have sensitive skin or prefer a non-glue option, you have choices.
- Double-Sided Wig Tape: This is a fantastic hack. Use high-quality, skin-safe wig or toupee tape on the inner surface of the ear prosthetic. It provides a strong but temporary hold that’s easy to remove.
- Molded Putty: Some cosplayers use materials like thermoplastic beads (shaped with hot water) to create a custom-molded clip that wedges securely in the folds of their own ear.
Hiding Attachments Under a Wig
A wig is your best friend for hiding attachment points. Many cosplay ears hidden under a wig use a small tab or wire that can be anchored securely.
- 1Use the Wig Line: Position the ear so the front edge tucks just under the hairline of your wig. This instantly hides the seam.
- 2Pin It Down: If your ears have a wire or plastic tab, slide it under the wig wefts and use a bobby pin or hair clip to anchor it to the wig cap or your hair beneath.
- 3Create a Pocket: For a truly invisible method, you can carefully snip a small hole in the wig cap and mesh, allowing the tab of the ear to slide inside and sit directly against your head, completely hidden.
For a comprehensive guide on these techniques, the go-to resource is our article on DIY Hacks to Attach Cosplay Ears Without a Headband. It offers the most detailed instructions for secure, hidden methods that ensure all-day comfort.
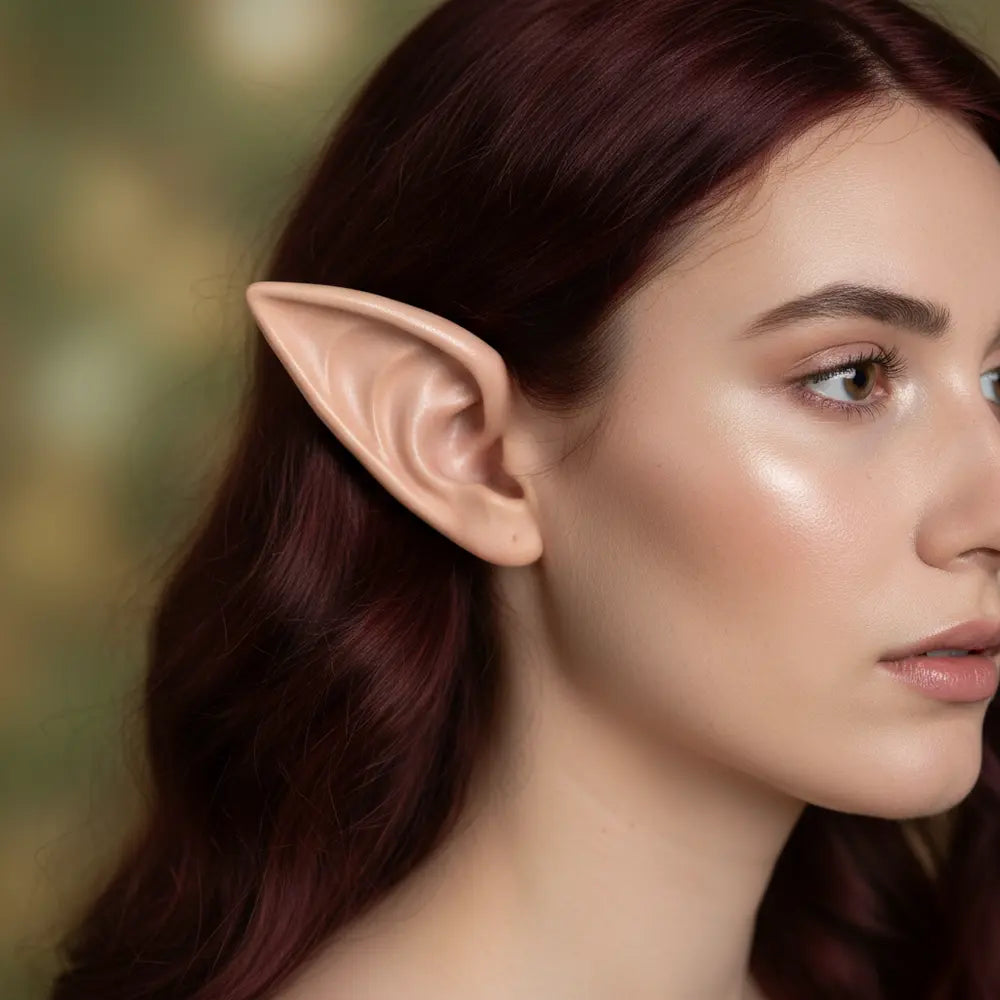
Realism & Blending Techniques
Frustrated because your prosthetic ears look stuck on rather than a natural part of you? This section provides the makeup artist secrets for blending seams, matching skin tones, and using shading to create a flawless, believable look.

The magic of seamless cosplay ears lies in the blend. Even the best prosthetic will look fake if not properly integrated with your skin. This process involves texture, color, and contour to trick the eye.
Hiding the Seam
The "seam" or edge of the prosthetic is the biggest giveaway. Making it disappear is your top priority.
- Liquid Latex Stippling: After gluing the ear down, use a disposable makeup sponge to lightly stipple a thin layer of liquid latex over the edge. This blurs the sharp line and creates a new, textured surface that mimics skin.
- Dissolving Edges: If you're using high-end prosthetics with acetone-soluble edges, you can use a cotton swab with a bit of acetone to literally melt the edge into your skin for a perfect blend.
Blending with Your Skin Tone
Getting the color right is crucial for realism. It’s rare that a prosthetic will match your skin perfectly out of the box.
- Foundation Matching: Apply your regular foundation over both your skin and the prosthetic to create a uniform base color. Use a tapping or stippling motion with a beauty sponge for the best coverage.
- PAX Paint: For ultimate durability, you can create a "prosthetic adhesive paint" (PAX) by mixing acrylic paint with Pros-Aide adhesive. This creates a flexible, sweat-proof color that will not rub off.
- Alcohol-Activated Palettes: These are the professional standard for coloring prosthetics. The pigments are activated with 99% isopropyl alcohol and provide a translucent, skin-like finish that is completely waterproof.
Using Makeup and Shading
A flatly colored ear looks unnatural. You need to add depth and dimension with contouring.
- Add Depth: Use a cool-toned contour powder or cream in the deep crevices of the ear to create shadows. This makes the ear look more three-dimensional.
- Create a Natural Flush: Use a bit of blush or a reddish-brown eyeshadow to add warmth and the appearance of blood flow to the inner parts of the ear, just as a real ear would have.
- Highlighting: A tiny amount of a subtle, non-sparkly highlighter on the highest points of the ear's cartilage can catch the light and add another layer of realism.
An expert cosplayer might spend 30 minutes just on blending. By layering foundation, contour, and a slight flush of color, they make a simple latex elf ear look like a natural extension of their own skin, a technique that holds up even under the scrutiny of HD cameras.
Cost vs. Quality: DIY vs. Store-Bought Comparison
Is it really cheaper to make your own cosplay ears, or are you just trading money for hours of potential frustration? We'll deliver a direct, side-by-side comparison of cost, time, and quality to finally settle the debate and help you invest your resources wisely.
The choice between DIY and store-bought is a classic cosplay dilemma. There is no single "best" answer—only the best answer for *your* specific situation. The decision hinges on a trade-off between your budget, available time, desired quality, and crafting skill.
Example Scenarios
Consider two different cosplayers:
- The Budget-Conscious Student: This cosplayer has more time than money. For them, spending a weekend and $25 on DIY materials is a fantastic deal. Even if the first pair isn't perfect, it's a valuable learning experience, and the result is a custom piece they can proudly say they made themselves.
- The Professional Competitor: This cosplayer is preparing for a major competition and needs guaranteed, film-quality results. Their time is better spent perfecting their sewing or performance. For them, buying a $75 pair of SFX-grade ears is a smart investment that ensures a flawless look without the risk and time sink of a DIY project.
Which Method Do You Prefer?
Tips, Hacks, and Common Mistakes
What are the small but crucial secrets that separate an amateur cosplay from a truly polished one? This section is packed with pro tips, quick fixes for on-the-go emergencies, and common mistakes to avoid so your ears stay perfect all convention long.
Checklist: Seamless Cosplay Ear Essentials
- Skin-Safe Adhesive (Pros-Aide or Spirit Gum) & Remover
- 91% Isopropyl Alcohol (for cleaning skin)
- Makeup Sponges & Q-tips
- Foundation, Contour, and Blush for blending
- Translucent Powder & Baby Powder for storage
- Emergency Kit: Wig Tape & Eyelash Glue
Quick Fixes for Slipping Ears
Even with the best adhesive, accidents can happen. Be prepared.
- The Wig Tape Trick: Carry a small roll of double-sided wig tape in your repair kit. If an ear starts to peel, you can quickly press a small piece of tape underneath for a surprisingly strong hold that will last for hours.
- Emergency Seal: A small tube of clear eyelash glue can also work in a pinch. It’s not as strong as Pros-Aide, but it’s skin-safe and can re-secure a loose edge long enough for you to get through a photoshoot.
- Setting Spray Is Your Friend: After blending your makeup, generously mist the ears and surrounding skin with a high-quality final seal setting spray. This locks the makeup in place and adds a slight tacky layer that helps everything stay put.
Avoiding Common Mistakes
Many cosplayers make the same few errors. Steer clear of these pitfalls.
- Mistake: Not Patch Testing Adhesive. Never use a new glue on your face for the first time at a convention. A bad allergic reaction can ruin your day and your skin. Test it on your inner arm 24 hours beforehand.
- Mistake: Applying to Oily Skin. Adhesives fail on oily surfaces. Before application, clean your skin and the inside of the prosthetic thoroughly with 91% isopropyl alcohol to remove any oils or residue.
- Mistake: Rushing the Removal. Tearing off prosthetics at the end of the day can damage the ear and your skin. Use the proper remover for your adhesive, work it under the edges slowly, and be patient.
Storage and Re-use
Proper care extends the life of your ears.
- Clean Immediately: After removal, gently clean off makeup and adhesive residue with the appropriate remover.
- Powder and Store: Once clean and dry, lightly dust the ears with baby powder or translucent powder. This prevents the latex from sticking to itself.
- Keep Their Shape: Store them in a small box or, ideally, on a cheap styrofoam wig head to help them maintain their natural shape and prevent the delicate edges from folding or creasing.
Final Decision Framework: Which Option Is Right for You?
Still feeling stuck between the allure of a custom DIY project and the convenience of a perfect store-bought pair? This final section provides a simple decision-making checklist to help you confidently choose the ideal solution based on your personal cosplay priorities.
By now, you understand the pros and cons of each path. The final choice comes down to weighing your personal resources: time, money, and skill. Use this simple framework to guide your decision.
What's more important to you: saving money or saving time?
Choose the DIY Path if...
- You have more time than money.
- You enjoy the process of crafting and learning new skills.
- Your character requires a completely unique ear shape that you can't find in stores.
- You are not afraid of some trial and error to get the perfect result.
Choose the Store-Bought Path if...
- You are on a tight schedule and need a reliable solution quickly.
- You prioritize a guaranteed, professional-looking result over a custom creation.
- You prefer to spend your cosplay time on other aspects like sewing or wig styling.
- You are a beginner and want a simple, straightforward introduction to wearing prosthetics.
Consider a Hybrid Approach
Don't forget that you can mix and match! This is a powerful strategy that many seasoned cosplayers use.
Start with an affordable but well-shaped pair of store-bought ears. You can then use your own skills to elevate them. Repaint them with alcohol-activated makeup for a perfect skin match, add custom piercings, or use liquid latex to improve the edge blend. This gives you a great balance of convenience and customization.
Ultimately, your cosplay journey is your own. Whether you craft your ears from scratch or find the perfect pair online, the goal is to create something that makes you feel proud and powerful. Don't be afraid to experiment and find what works best for you.
We hope this guide has empowered you to achieve the seamless cosplay ears of your dreams. Building incredible cosplays involves many different skills and accessories.
If you’re interested in expanding your cosplay accessory game, explore our guide on From Anime Con to Everyday: Why Fox Tails Are Trending, or dive into the tech behind interactive gear with From Cute to Clever: What Are Moving Cat Ears?
For more cosplay tips and exclusive guides delivered to your inbox, be sure to sign up for our newsletter!
Frequently Asked Questions (FAQ)
1. How do you blend cosplay ears with your hair if you're not wearing a wig?
The best way is to use your natural hair to hide the top and back of the prosthetic. Style your hair so that some strands fall naturally over the top seam of the ear. You can also use a small hairpin or clip, hidden under a layer of hair, to help secure the ear in place for a truly seamless look.
2. What's the best adhesive for cosplay ears that is also safe for sensitive skin?
For sensitive skin, Pros-Aide is generally considered the best choice. It's a water-based medical-grade adhesive, which is much gentler than traditional spirit gum. Always remember to do a 24-hour patch test on your arm before applying it to your face to ensure you don't have a reaction.
3. Can you reuse latex elf ears, and how many times?
Yes, you can absolutely reuse latex ears. With proper care, a good pair can last for 5-15 wears. The key is to be gentle during removal, use the correct adhesive remover, and clean them thoroughly of all makeup and glue residue after each use. Storing them with a light dusting of powder will prevent them from degrading.
4. About how long does it take to make a good pair of DIY cosplay ears from scratch?
For a beginner, the entire process can take between 8 to 12 hours of active work, spread out over 2-3 days. This includes sculpting (2-4 hours), making the mold (1 hour + drying time), casting the latex (2-3 hours of layering and drying), and painting (1-2 hours). Experienced creators can speed this up significantly.