DIY 3D Printed Animatronic Ears for Fursuits
DIY 3D Printed Animatronic Ears for Fursuits
Ever wished your fursuit or cosplay ears could twitch and react just like the real thing? It’s a detail that can bring a character to life. But for many, the thought of electronics, coding, and 3D print animatronic ears feels impossibly complex and expensive. You're not alone in feeling that way.
The good news is that creating your own expressive, moving ears is more accessible than ever. This guide is designed specifically for total beginners. We will walk you through every stage, from the tools you need to the files you’ll print, and even the simple copy-paste code to make them move. There is no confusing engineering talk here.
Imagine walking into a convention, and with a subtle twitch of your ears, you draw smiles and capture the attention of photographers. That level of character interaction is within your reach.
By the end of this guide, you will have a clear roadmap to build your own moving ears. You will understand the process, have confidence in the parts you need, and be ready to create something amazing—without wasting money or getting lost in technical jargon.
Why Animatronic Ears Make Your Cosplay Stand Out
Have you ever wondered what separates a good cosplay from a truly unforgettable one?
It’s often the small, dynamic details that create a spark of life. This section explains why adding movement is one of the most powerful ways to elevate your character.
Movement creates an illusion of life that static props simply can't match. When your fursuit ears suddenly flick in response to a sound or a friend’s comment, it transforms your costume from a simple outfit into a living character. This is the magic of DIY 3D printed ears.
This dynamic element is incredibly powerful for engagement. At busy furry conventions or cosplay competitions, animatronics are a guaranteed showstopper. They invite interaction, making people curious about how they work and adding a layer of realism that gets you noticed. This is why characters with moving parts often become highlights of the event.
Explore the Tech Behind the Magic For those fascinated by the blend of technology and cuteness, our deep dive into the mechanics and emotional appeal of moving ears provides even more insight. Discover the science behind the adorable tech.A common misconception is that this tech is only for elite builders. In reality, simple servo-driven mechanisms are now a popular entry point into animatronics. For LARP (Live Action Role-Playing) or any immersive event, these details deepen the performance and help you stay in character more convincingly.
What You’ll Need: Tools, Materials, and STL Files
Feeling lost looking at endless lists of tools and parts, worried you’ll buy the wrong thing?
We’ve created a simple, no-fluff checklist of the absolute essentials. This is everything you need to get started without breaking the bank or feeling overwhelmed.
Before you can build, you need your toolkit. We’ve broken the list down into three core categories: the tools to build with, the materials to print with, and the digital blueprints that will guide your printer.

Your Animatronic Ear Project Checklist
Essential Tools for the Build
You don’t need a professional workshop to create DIY fursuit ear mechanism parts. A few key tools will handle 99% of the job. Think of this as your starter pack for the world of cosplay electronics.
- An Affordable 3D Printer: You don't need a thousand-dollar machine. Models like the Creality Ender 3 or Anycubic Kobra are famously beginner-friendly and often available for under $300. They are the workhorses of the hobbyist community.
- A Hot Glue Gun: This is the maker's best friend. It’s perfect for securing wires, mounting servos, and making quick, non-permanent attachments. It provides a strong but flexible bond that's ideal for electronics.
- A Small Screwdriver Set: You'll need this for tiny screws that often come with servo motor kits and for assembling some printed parts. A simple jeweler's screwdriver set is perfect.
- Pliers or Wire Strippers: While not always necessary for beginner kits, a small pair of needle-nose pliers can be helpful for handling small parts and wires.
Choosing Your Materials
The materials are the physical substance of your project. Choosing the right ones ensures your ears are both lightweight and durable enough to survive a full day at a convention.
- PLA Filament: This is the best 3D printing material for beginners. It’s easy to print, non-toxic, and affordable. One kilogram spool costs around $20 and is enough for dozens of ear projects. Stick with a standard 1.75mm diameter, as it’s compatible with most hobbyist printers.
- Servo Motors: These are the tiny mechanical muscles that will make your ears move. For a first project, the SG90 or MG90S micro servos are the gold standard. They are cheap, tiny, and powerful enough for most ear designs. You will need two—one for each ear.
- Arduino and Wires: The Arduino is a tiny, programmable computer that will tell your servos what to do. An Arduino Uno or Arduino Nano is perfect. You'll also need a breadboard and jumper wires to connect everything without any soldering.
Understanding and Finding STL Files
An animatronic ears STL file is the digital blueprint your 3D printer reads to create a physical object. Finding a good, beginner-friendly file is one of the most important steps.
An STL file contains the 3D model of your ear mechanism. You will load this file into a program called a "slicer," which prepares it for your specific 3D printer. These files determine the shape, size, and mechanical function of your ears.
You can find STL files on websites like Thingiverse, MyMiniFactory, and Cults3D. Many are free, offered by creators in the community. You can also find premium, highly-tested files for sale on platforms like Etsy, which often come with detailed instructions.
A common pitfall is downloading a complex file designed for advanced users. For your first build, look for files with words like "simple," "beginner," or "SG90" in the description. For a deeper analysis of the top options available, the go-to resource is our curated guide on the Best Animatronic Ears STL Files for Fursuits, which breaks down the pros and cons of popular designs.
Find Your Perfect Blueprint Don't waste time and filament on unreliable files. Our comprehensive guide reviews the best free and premium STL files, tested for printability and realistic movement. Get our expert recommendations here.Step 1: Download and Prepare the STL Files
Staring at a list of files and feeling unsure which one to choose or what to do next?
This step demystifies the process, showing you how to select the right blueprint and get it ready for printing, ensuring your project starts on the right foot.
Your journey from digital to physical starts here. Choosing the right animatronic ears STL file is crucial. For your first project, prioritize simplicity over complexity. Look for designs with fewer parts and clear assembly instructions. A simple cat ear mechanism is a much better starting point than a complex, multi-jointed wolf ear.
Check the comments and "makes" section on the STL file's download page. This is where other makers post pictures of their successful prints and share tips. If dozens of people have successfully printed a file, it’s a great sign that it's a reliable design.
Once downloaded, you'll open the STL file in a "slicer" application. This software, like Ultimaker Cura or PrusaSlicer (both are free), "slices" the 3D model into hundreds of thin layers and creates the instructions (G-code) for your 3D printer. This is where you tell the printer exactly how to build your parts.
Step 2: 3D Printing Your Ear Mechanisms
Ready to turn that digital file into a real object but worried about the print failing?
Let's walk through the essential settings that will give you a strong, successful print without getting bogged down in technical details.
This is the most exciting part for many first-time makers. With your file loaded in the slicer, you just need to adjust a few key settings to ensure a great result. Don’t be intimidated by the dozens of options; you only need to focus on three for now.
- Layer Height: This determines the vertical resolution of your print. A setting of 0.2mm is the perfect balance of speed and detail for mechanical parts.
- Infill: Think of this as the internal support structure of your print. For animatronic parts that need to be strong but light, an infill of 20-25% is ideal. It creates a sturdy internal grid without wasting plastic.
- Supports: Some parts have overhangs that can't be printed in mid-air. The slicer can automatically generate temporary "supports" to hold these areas up during printing. Always enable supports when printing complex shapes.
A common mistake is rushing the print. While it’s tempting to increase the print speed, this can lead to weak parts or complete failures. Let the printer take its time. Once you’ve configured the settings, save the G-code to your printer’s SD card and start the print!

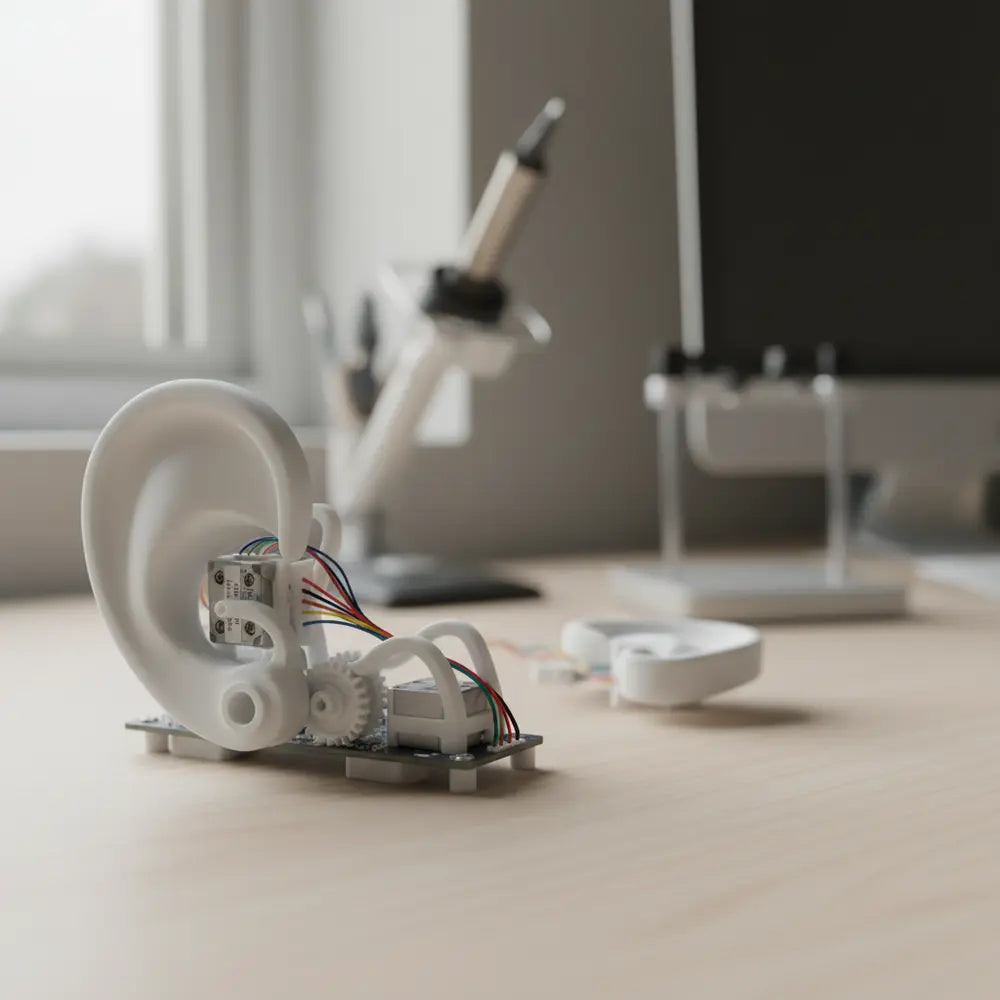
Step 3: Assembling the Mechanical Parts
You have a pile of freshly printed plastic parts. Now what?
This is where it all comes together. Think of it like a simple 3D puzzle. We’ll guide you through connecting the pieces to build your functional ear mechanism.
Once your parts are printed and cooled, carefully remove any support material. Now, lay them out and do a "test fit" before reaching for any glue. Sometimes, tiny imperfections in a print can make the fit tight. A little bit of light sanding on the connecting surfaces can make assembly much smoother.
Next, it's time to install the servo motor. Your printed mechanism should have a perfectly sized slot for the SG90 or MG90S servo. Gently press the servo into its housing. It should be a snug fit. Secure it with the small screws that came with the servo or a small dab of hot glue if needed.
Finally, attach the moving part of the ear mechanism to the servo's rotating arm (the "servo horn"). Most STL designs will have a specific way to screw or clip this piece on. Your 3D printed cosplay mechanism is now fully assembled and ready for electronics.
Step 4: Wiring the Electronics (No Experience Needed)
Does the word "wiring" make you nervous? Worried you’ll fry your components?
We'll show you that it’s as simple as plugging in a few color-coded cables. No soldering or electrical knowledge is required.
This is the step that intimidates most beginners, but it's surprisingly simple with modern tools. We'll use an Arduino, a breadboard, and jumper wires to connect everything. The breadboard acts as a plug-and-play switchboard, letting you connect and disconnect wires easily.
The servo motor has three wires:
- Brown or Black: This is the Ground wire (GND).
- Red: This is the Power wire (5V).
- Orange or Yellow: This is the Signal wire, which receives commands.
Here’s the simple connection plan for one ear:
- Plug the Brown/Black wire into the Arduino's GND pin.
- Plug the Red wire into the Arduino's 5V pin.
- Plug the Orange/Yellow wire into one of the Arduino's digital pins, like pin 9.
That's it! Your servo is now connected. To connect the second ear, simply repeat the process, plugging its signal wire into a different digital pin, such as pin 10. A key pro-tip is to always connect the ground wire first and disconnect it last. This simple habit helps protect your electronics from accidental shorts.
Step 5: Programming with Arduino (Beginner Mode)
Scared of coding? Convinced you need to be a programmer to make things move?
We promise: if you can copy and paste, you can program these ears. This section gives you the exact code to bring your creation to life in minutes.
With the hardware assembled and wired, the final step is telling the Arduino what to do. This is done with the free Arduino IDE software. You don’t need to learn a programming language; for this project, you can simply copy and paste a pre-written "sketch."
Here is a super simple code to make one ear twitch back and forth. Just copy this entire block and paste it into a new sketch in your Arduino IDE.
#include <Servo.h>

Servo leftEarServo; // Create a servo object to control the left ear

void setup() {
  leftEarServo.attach(9); // Attaches the servo on pin 9 to the servo object
}

void loop() {
  leftEarServo.write(80);  // Tell servo to go to position 80 (slight twitch)
  delay(500);              // Wait for half a second
  leftEarServo.write(100); // Tell servo to go to position 100 (twitch back)
  delay(1000);             // Wait for one second
}
In this code, `servo.write()` tells the ear its position, and `delay()` tells it how long to wait. By changing these numbers, you can create faster twitches, slower movements, or different resting positions.
Once you paste the code, connect your Arduino to your computer via USB, select the correct board and port in the "Tools" menu, and click the "Upload" button. Within seconds, your ear will spring to life! For more advanced movements, our DIY Animatronic Fursuit Ears: Full STL Guide includes several pre-written code snippets for different behaviors.
Get Advanced Code & Full Visuals Ready for more? Our complete DIY guide offers multiple code examples for different movements and detailed visual instructions for the entire build. Access the full guide now.Step 6: Attaching the Ears and Fur Covering
Your mechanism works! But how do you turn this plastic skeleton into a beautiful, furry ear?
This final creative step is all about aesthetics. We'll show you how to mount the mechanism and cover it in fur to bring your character to life.
The first challenge is mounting the mechanisms. A sturdy plastic headband is the easiest solution. You can attach the base of each printed mechanism directly to the headband using hot glue or zip ties. For a more professional look, some makers embed powerful neodymium magnets into the headband and the base of the ears for a strong, snap-on connection.
Next, create the fur covering. A common mistake is to glue fur directly onto the moving parts, which can jam the mechanism. A much better method is to create a "fur sock." Sew a piece of faux fur into a cone or ear shape that is slightly larger than your mechanism.
This sock can then be slipped over the entire assembly. You can secure the base of the sock to the base of the mechanism with a bit of hot glue or a few stitches, leaving the moving parts free inside. This method also allows you to easily remove the fur for cleaning or to access the electronics for maintenance.

Show Off Your Animatronic Ears!
You built them, and they look amazing. Now what?
Let’s make sure your hard work gets the attention it deserves and survives its first convention. Here are some tips for durability, transport, and sharing your creation with the world.
Congratulations, you've created 3D printed animatronic ears! To ensure they last, add a few drops of hot glue to secure any wire connections that feel loose. A little reinforcement goes a long way in a crowded environment.
When traveling to a convention, never just toss your ears into a bag. The delicate mechanisms can easily be damaged. The best pro-tip is to use a small, hard-sided container filled with foam padding. This protects the ears from being crushed and keeps them safe during transit.
Finally, share your work! The cosplay and furry communities thrive on seeing new creations. Post a video of your ears in action on TikTok, Instagram, or Twitter. Use hashtags like #animatronicsears, #fursuitmaker, and #3Dprintedcosplay to connect with other makers. Your build could be the very thing that inspires someone else to start their own project.
Community Showcase: See What's Possible!
You're joining a vibrant community of creators. Check out these amazing builds from makers just like you who started with a simple guide and brought their characters to life.
@MakerFox_Cosplay
@LunaWolfProps
@RoboRabbit_Builds
Your Journey into Animatronics Has Begun
You did it. You’ve walked through the entire process, from a digital file to a fully functional animatronic accessory. The intimidation you might have felt at the start has been replaced by the knowledge and confidence of a maker. You now have the fundamental skills to build your own DIY 3D printed ears.
The most important step now is to simply start. Choose a simple animatronic ears STL, gather your materials, and take it one step at a time. Your first build doesn't have to be perfect; it's a learning experience that opens the door to countless future projects.
As you get more comfortable, you can explore adding more complex movements or even animatronic tails, a trend that's growing beyond just conventions. For your next build, be sure to check out our other tutorials on animatronic cosplay parts.
Ready for Your Next Project? Now that you've mastered ears, why stop there? See why animatronic fox tails are the next big trend in cosplay and learn how to build your own. Explore the fox tail trend now.To get free STL file recommendations and more beginner-friendly 3D printing guides delivered right to your inbox, subscribe to our newsletter. Happy making!
Frequently Asked Questions (FAQ)
How much does it cost to make DIY animatronic ears?
For a complete beginner setup, you can expect the initial cost to be around $250-$350. The biggest expense is the 3D printer ($200-$300). The actual materials for a single pair of ears—including filament, servos, and an Arduino kit—typically cost less than $30, making subsequent projects very affordable.
What's the easiest animatronic ear STL for a total beginner?
Look for files on sites like Thingiverse or Printables that are labeled "SG90 Simple Ear Mechanism" or "Beginner Animatronic Ears." The best designs for a first-timer will have a low number of parts (ideally under 5 per ear) and use a single servo motor for a simple twitch or rotation movement.
Can I make the ears react to sound or my voice?
Yes, but this is an intermediate-level project. It involves adding a microphone sensor to your Arduino. The Arduino can then be programmed to read the sound levels from the microphone and trigger a servo movement when the sound passes a certain threshold. It's a fantastic second or third project once you've mastered the basics.
How do I power the ears at a convention?
While you can power the Arduino with a USB cable connected to a computer, that's not practical for cosplay. The standard solution is to use a portable USB power bank—the same kind you use to charge your phone. A small 5000mAh power bank can power your ears for an entire day. You will need a USB A-to-B cable to connect the power bank to your Arduino Uno.