DIY Animatronic Fursuit Ears: Full STL Guide
You're standing in the vibrant, bustling hall of a cosplay convention. All around you are incredible costumes, but many feel static. Then, you see it. A fursuiter’s ears twitch in response to a sound, then fold back playfully. The character feels alive. That small detail instantly elevates the entire build from a costume to a performance.
This is the power of animatronics. But figuring out how to build your own DIY fursuit ear mechanism can be frustrating. Tutorials are often scattered—one shows you the 3D print, another has confusing code, and none explain how to put it all together reliably. You end up wasting time and money on parts that don't work.
This guide is different. We will walk you through the entire process in one place. You will learn how to select and print STLs, assemble the mechanics, wire the Arduino and servos, and upload the code. This is your complete blueprint for creating affordable, convention-ready animatronic fursuit ears that will make your character unforgettable.
Why Animatronic Ears Elevate Your Fursuit
Ever wonder what separates a good fursuit from a truly memorable one? This section explains how adding motion creates an emotional connection and showcases your technical skill, making you stand out in a crowd.
In a sea of static costumes, movement is what captures attention. Animatronic ears inject personality and realism into your character, transforming it from a simple outfit into a living persona. A subtle ear flick or a sudden perk can convey surprise, curiosity, or happiness without you saying a word. This creates a much deeper level of interaction with your audience. To get a better sense of how this technology creates such an impact, it's worth exploring the fundamentals. If you're curious about the basics, our article "From Cute to Clever: What Are Moving Cat Ears?" dives into the science and appeal behind this kawaii tech.
Beyond the performance aspect, building a functional animatronic ear mechanism is a badge of honor for any maker. It demonstrates a fusion of artistic and technical skill. It shows you not only designed a beautiful character but also engineered it to life. This level of craftsmanship is often what judges look for in cosplay competitions and what fellow makers admire.
Finally, the DIY route offers incredible freedom. Instead of being limited to off-the-shelf options, you control the size, shape, and movement style. You can build a system that is perfectly scaled to your fursuit head and programmed with unique gestures. This approach is also significantly more affordable, putting high-end features within the reach of any dedicated hobbyist.
Choosing the Right STL Files for Animatronic Ear Mechanisms
Confused by the hundreds of 3D models available online? Here, you'll learn how to identify high-quality, reliable STL files and what design features are critical for a successful build.
The foundation of your project is the 3D model. Your choice of STL files will determine the mechanism's durability, smoothness of motion, and ease of assembly. You can find files on platforms like Thingiverse, Printables, and Cults3D. When searching, use terms like `animatronic ears`, `servo ear mechanism`, or `moving cosplay ears`.
Look for designs with clear assembly instructions or, even better, a video guide. A good design will specify exactly which servo motors (like the common SG90 or MG90S) and what size hardware (screws, bearings) you need. This saves you from a massive headache of guessing and buying the wrong parts.

A common misconception is that any "free" file is good enough. Many free designs are untested prototypes. It's often better to choose a popular file with many "makes" and positive comments, as this means the community has already vetted it for you. This social proof is more valuable than the file's cost.
Interactive STL Selector
Answer two quick questions to find the best type of STL for your project.
1. What's your primary goal?
Key Design Features to Look For
- Durable Linkages: Check that the moving parts are not too thin or fragile.
- Secure Servo Mount: The servo motor must fit snugly in its housing. A loose servo will cause jitter and imprecise movement.
- Cable Management: Does the design have channels or holes to route servo wires cleanly? This is crucial for a tidy, reliable build.
- Scalability: Some designers provide notes on how much you can scale the model up or down before it fails.
3D Printing Setup: Materials, Printers, and Tips
Worried your 3D prints won't be strong or precise enough for moving parts? This section covers the best materials and printer settings to ensure your mechanical parts are durable, accurate, and ready for assembly.
The material you print with is critical for the longevity of your DIY 3D printed ears. While PLA is easy to print, it can become brittle and warp in a hot car or in direct sun at an outdoor convention. For mechanical parts, PETG is a far superior choice. It offers better heat resistance and a slight flex that prevents parts from snapping under stress.
Think of it like car tires: PLA is like a standard road tire, good for everyday conditions. PETG is like an all-season tire, tougher and more reliable when things get a little rough. For the most demanding applications, you could even consider ABS or ASA, but they are more difficult to print and require a well-ventilated area.

Your printer settings are just as important. For the small, precise parts in an animatronic ear mechanism, use a smaller layer height, like 0.12mm or 0.16mm. This increases print time but results in smoother surfaces and a better fit. A higher infill percentage (40-60%) will also add significant strength to the parts.
Pro-Tips for Printing Mechanical Parts
- Use a Brim: Printing with a brim adds a single layer of filament around the base of your part, preventing corners from lifting or warping.
- Calibrate Your Printer: Before starting, run a calibration test to ensure your dimensions are accurate. A part that's off by even half a millimeter can cause binding.
- Orient for Strength: Orient parts on the print bed so that the layers run perpendicular to the direction of stress. This dramatically increases their strength.
- Smooth Finishing: After printing, carefully remove any support material. Lightly sand the surfaces of joints and linkages with fine-grit sandpaper to ensure a frictionless, smooth motion.
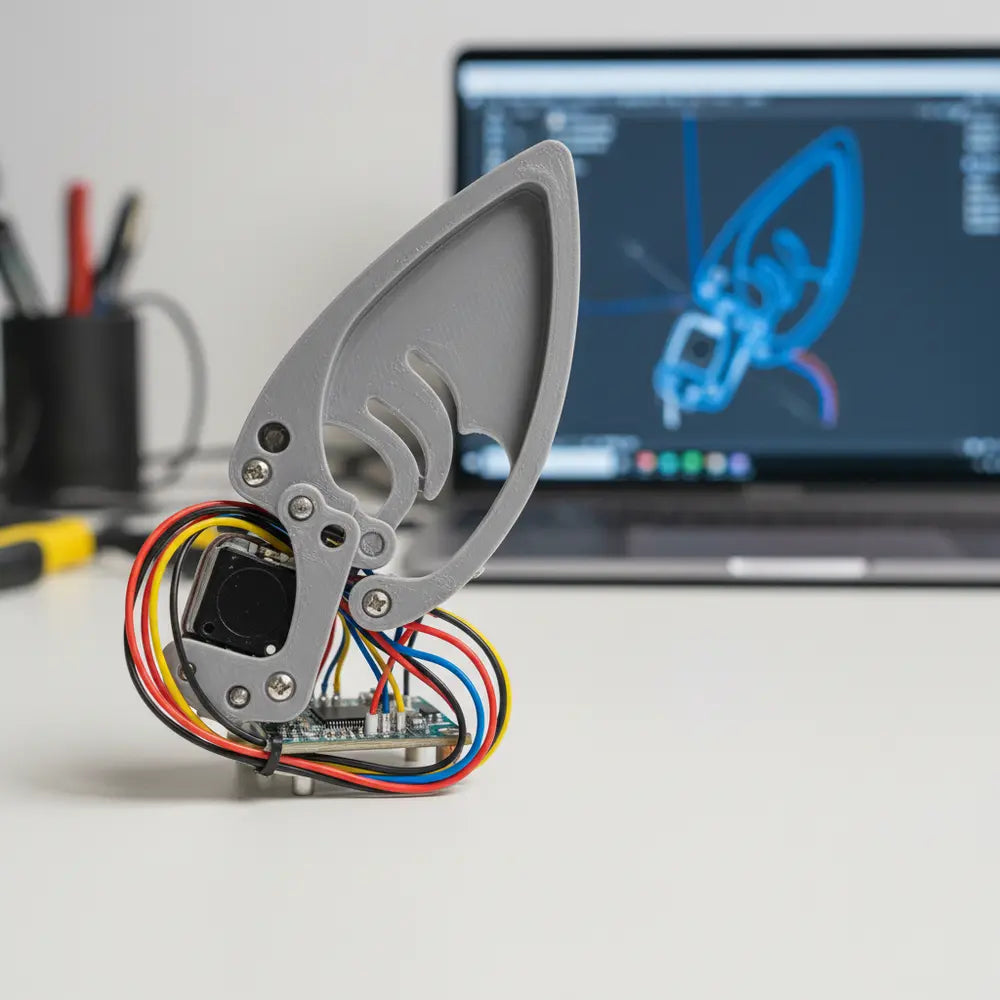
Assembly: Bringing the Mechanism Together
Have a pile of 3D printed parts and not sure where to start? We'll guide you through the assembly process step-by-step, ensuring your mechanical build is solid and moves freely.
Now that your parts are printed and finished, it's time for the most satisfying step: assembly. This is where your servo-controlled ears start to take physical form. Before you begin, lay out all your printed parts, screws, bearings, and servo motors on a clean workspace. Having everything organized will make the process much smoother.
Tools and Hardware You'll Need
Feeling unprepared for the build? Here’s the essential toolkit and hardware list, so you have everything you need on hand before you start turning screws.
You don't need a full machine shop, but a few specific tools will make your life easier. A set of precision screwdrivers is a must-have for the small M2 or M3 screws typically used in these builds. A pair of calipers can also be useful for verifying that you're using the correct length screws.
Hardware Checklist:
- Screws: The STL designer will specify the sizes (e.g., M2x8mm, M3x12mm). Get a few extras.
- Nuts or Heat-Set Inserts: Some designs use nuts, while higher-end ones use heat-set inserts for a more professional and durable thread.
- Bearings (Optional): Premium designs may use small bearings (like 683ZZ) for pivot points. These create an incredibly smooth motion.
- Thread-locker: A small drop of blue (medium strength) Loctite on key screws will prevent them from vibrating loose during use.
Step-by-Step Assembly Guide
Afraid of putting a part in the wrong place? Follow this logical sequence to assemble your mechanism correctly the first time, preventing the need to take it all apart again.
Start by installing any heat-set inserts or bearings. If using inserts, use a soldering iron to gently heat them and press them into the plastic. They should sit flush with the surface. This is a pro-level tip that dramatically improves the build's reliability over time, as it prevents stripped threads in the plastic.
Next, mount the servo motors into their housings. Ensure they are secure and do not wobble. A common mistake is to overtighten the mounting screws, which can crack the 3D printed part. Just get them snug. Attach the main linkages to the servo horn, but don't connect the horn to the servo spline just yet.
Assemble the rest of the ear base and moving linkages. As you connect each joint, check for smooth, free movement. If you feel any catching or binding, stop and investigate. It's often caused by a small piece of stray filament or a rough surface that needs a bit more sanding. Only once the entire mechanism moves freely by hand should you attach the horns to the servos.
Electronics 101: Wiring Your Servos and Arduino
Intimidated by the tangle of wires and electronic components? This section demystifies the wiring process, providing a clear, foolproof guide to connecting your servos to an Arduino for reliable power and control.
This is the part that stops many makers in their tracks, but it's simpler than it looks. The Arduino cosplay electronics are the brain of your operation, telling the servos when and how to move. We will connect the Arduino, the servos, and a power source in a way that is safe and effective.
Selecting Your Components (Arduino, Servos, Power)
Overwhelmed by all the different microcontrollers and motors? We'll help you choose the right "brain," "muscles," and "food" for your project, focusing on affordable and beginner-friendly options.
For the brain, an Arduino Nano or a clone is the perfect choice. It's small, cheap, and powerful enough for this project. For the muscles, MG90S metal-gear servos are highly recommended over the blue plastic SG90s. They are only slightly more expensive but are far more durable and less prone to stripping their gears.
The most critical choice is your power supply. A common failure point is trying to power the servos directly from the Arduino's 5V pin. Servos can draw a lot of current, causing the Arduino to crash or reset. You need a separate, stable power source. A 4xAA battery pack is a great, simple solution that provides the right voltage and current.
For a deeper understanding of how these components work together in cosplay, the go-to resource is our article "How Animatronic Ears & Tails Work for Cosplay." It provides excellent diagrams and fundamental concepts for any animatronics builder.
The Wiring Diagram: A Foolproof Connection Guide
Worried you'll connect a wire to the wrong pin and fry your components? This simple wiring plan breaks it down into three easy steps, ensuring your circuit works safely from the start.
We'll connect everything following a simple, safe pattern. Each servo has three wires: Ground (Brown/Black), Power (Red), and Signal (Orange/Yellow).
- Connect the Signal Wires: Connect the signal wire from your left ear servo to a digital PWM pin on the Arduino (e.g., D9). Connect the right ear servo's signal wire to another PWM pin (e.g., D10). These pins have a `~` symbol next to them.
- Connect the Power Wires: This is the most important step. Connect the red power wires from both servos directly to the positive (+) terminal of your 4xAA battery pack. Do not connect these to the Arduino's 5V pin.
- Create a Common Ground: Connect the brown/black ground wires from both servos to the negative (-) terminal of your battery pack. Then, run one final wire from the battery pack's negative terminal to any `GND` pin on the Arduino. This "common ground" is essential for the signal to work.
The Code: Bringing Your Ears to Life with Arduino
Think you need to be a coding genius to program animatronics? We'll provide a simple, copy-paste code sketch to get your ears moving instantly, and then show you how easy it is to customize.
With the hardware built and wired, the final step is to upload the code—the "soul" of your machine. The Arduino IDE is a free software you can download to write and upload code (called "sketches") to your board. You don't need to be a programmer; for a basic animatronic ear mechanism, the code is surprisingly straightforward.
Uploading Your First Sketch
Nervous about your first time uploading code to a microcontroller? This beginner-friendly walkthrough ensures a successful upload, taking you from a dead mechanism to moving ears in just a few clicks.
First, you'll need to install the `Servo.h` library in the Arduino IDE. This library simplifies the control of servo motors. Think of it as a pre-packaged set of commands, so you don't have to write everything from scratch. You can install it by going to `Sketch > Include Library > Manage Libraries...` and searching for "Servo."
Here is a basic sketch to get you started. Copy and paste this into a new file in your Arduino IDE. This code will make the ears perform a simple "sweep" motion back and forth.
#include <Servo.h>

Servo leftEar;  // create servo object to control the left ear
Servo rightEar; // create servo object to control the right ear

void setup() {
  leftEar.attach(9);  // attaches the servo on pin 9
  rightEar.attach(10); // attaches the servo on pin 10
}

void loop() {
  // Sweep from 0 to 90 degrees
  for (int pos = 0; pos <= 90; pos += 1) {
    leftEar.write(pos);
    rightEar.write(pos);
    delay(15);
  }

  // Sweep from 90 to 0 degrees
  for (int pos = 90; pos >= 0; pos -= 1) {
    leftEar.write(pos);
    rightEar.write(pos);
    delay(15);
  }
}
Before uploading, go to `Tools > Board` and select "Arduino Nano." Then, select the correct Port. Click the arrow icon to upload. If everything is wired correctly, your ears should spring to life!
Customizing Movement Patterns and Triggers
Want your ears to do more than just sweep back and forth? Learn the building blocks of custom animations, allowing you to program unique and expressive gestures for your character.
The basic sketch is just a starting point. The real fun of an Arduino-controlled animatronic ear is creating custom movements. You can create functions for different emotions. For example, a `twitch()` function could move the ears quickly to a few random positions, while a `droop()` function could slowly lower them.
void twitch() {
  leftEar.write(45);
  rightEar.write(55);
  delay(100);
  leftEar.write(50);
  rightEar.write(50);
  delay(150);
}
You can then call these functions randomly within your `loop()` to create a more natural, less repetitive motion. Advanced builders can add buttons or sound sensors as triggers. A button push could activate a "happy" animation, while a loud noise detected by a microphone sensor could trigger a "startled" ear perk.
Troubleshooting Common Animatronic Ear Issues
Are your servos buzzing, jittering, or not moving at all? This section is your emergency room for common failures, providing quick-fix solutions to get your project back on track.
Even with a perfect plan, you might run into issues. This is a normal part of the maker process. Most problems with a DIY fursuit ear mechanism fall into three categories: power, code, or mechanical issues. Don't get discouraged; almost every problem is fixable.
A builder on an r/arduino forum shared a classic case study. Their servos were jittering wildly and getting hot. They tried everything in the code, but the problem was power. By adding a large capacitor (1000uF) across the servo power and ground lines, the jitter disappeared. The capacitor acted like a tiny, ultra-fast battery, smoothing out the current demands from the servos.
Common Problems & Fixes:
- Servos Jittering: This is almost always a power issue. Ensure you are using a separate power supply for the servos, not the Arduino's 5V pin. Check that your batteries are fresh and all ground connections are solid.
- Ears Not Responding: Double-check your signal wire connections. Did you connect them to the correct digital pins on the Arduino (D9 and D10 in our example)? Also, ensure your sketch uploaded without any errors.
- Mechanical Binding: If a servo is buzzing but not moving, it's likely stuck. Disconnect the servo horn and see if the mechanism moves freely by hand. If not, you need to find the friction point and sand it down.
- One Ear Moves Backwards: This is a simple fix. You can either reverse the servo's movement in the code (e.g., `rightEar.write(180 - pos);`) or physically mount the servo in the opposite orientation.
Showcasing Your Build and Next Steps
Your animatronic ears are working perfectly, so what's next? Learn how to safely show off your creation at conventions and explore advanced modifications to take your skills to the next level.
Congratulations, you've built a working animatronic ear mechanism! The final step is to integrate it into your fursuit head and share it with the world. When mounting the mechanism, ensure it is secure but also accessible. You may need to replace batteries or make small repairs, so plan for a hidden access panel.
Documenting your build process with photos or a video is a great way to contribute to the community. Post it on maker forums or social media. Not only does this help others, but it also establishes you as a skilled creator.
Community Showcase: Maker Builds
Maker: @RoboFox
"This guide was a lifesaver! The wiring part finally clicked and made sense."
Maker: @Cybunny
"My ears were a hit at the con. The PETG tip is crucial for durability."
Maker: @CircuitCat
"Followed the assembly steps exactly. No binding or jittering at all!"
Once you've mastered the ears, the possibilities are endless. Why not sync them with an animatronic tail? A maker named "Synth," for example, used two Arduinos communicating via I2C to perfectly synchronize ear and tail movements, creating an incredibly lifelike performance.
For those ready to push their skills further, the definitive guide for advanced features is our tutorial on "DIY Animatronic Cat Ears with Arduino." It explores using sensors for sound reactivity and accelerometers for head-tracking movements, offering a clear path to truly next-level animatronics. If you're also interested in tails, our article "From Anime Con to Everyday: Why Fox Tails Are Trending" is a great source of inspiration for your next project.
Conclusion
You've journeyed from a simple idea to a fully functional piece of wearable technology. By choosing the right STL, carefully printing and assembling the parts, wiring the electronics, and breathing life into it with code, you've created a standout feature. You've conquered the common frustrations that stop most people.
Your animatronic fursuit ears are more than just a cool gadget. They are proof of your skill, dedication, and creativity. At your next convention, that subtle twitch and playful flick will create a magical connection with everyone you meet, bringing your character to life in a way a static costume never could.
Ready to build even more? Subscribe to our mailing list for advanced tutorials on animatronic tails, wings, and other complex cosplay projects.
Frequently Asked Questions
1. How much does it cost to build DIY animatronic ears?
An affordable animatronic ear build for fursuits is very achievable. An Arduino Nano clone, two MG90S servos, a battery holder, and filament will typically cost between $20 to $40, making it a very cost-effective project compared to buying a pre-made system.
2. How heavy is an animatronic ear mechanism?
A well-designed 3D printed mechanism using two micro servos is surprisingly lightweight, usually adding only 50-100 grams to the head. Using lightweight filament like PETG and optimizing infill settings helps keep the weight down, ensuring it's comfortable to wear for long periods.
3. Can I make the ears respond to my voice?
Yes, this is an excellent next-level modification. You can add a small microphone sensor module to your Arduino. By programming the Arduino to listen for sound levels, you can trigger specific ear movements, like perking up when it detects a loud noise or your voice.
4. How long do the batteries last?
Using a 4xAA battery pack with quality alkaline or rechargeable NiMH batteries (around 2000-2500mAh), you can typically expect 4-8 hours of continuous, active movement. The exact time depends on how often the servos move and how efficient they are. It's always a good idea to bring a spare set of batteries to a convention.