DIY Wolf Tail: Handmade Faux Fur Tutorial
DIY Wolf Tail: Handmade Faux Fur Tutorial
Ever scrolled through pages of cosplay accessories, only to find the perfect wolf tail is either wildly expensive or looks disappointingly cheap? You're not alone. Many store-bought options lack the personality and quality that a truly great costume deserves. The good news is you can craft a stunning, realistic handmade faux fur wolf tail yourself, even with zero sewing experience.
This guide is designed for beginners. We'll give you a clear, affordable, and easy step by step wolf tail crafting guide. We're breaking down everything from choosing your materials to the final stitch. You’ll learn to create a custom wolf tail perfect for cosplay, a unique Halloween costume, a child’s dress-up box, or your next LARP adventure.
Get ready to create a wolf cosplay accessory that is uniquely yours. We'll walk you through the entire process, covering the materials list, the simple sewing technique, and tips for adding those professional-looking details.
Why Make Your Own Handmade Wolf Tail?
Ever wonder if the effort of a DIY project is really worth it compared to just clicking 'buy'? Are you looking for a costume piece that truly stands out and reflects your character's unique story?
This section reveals how making your own tail unlocks unmatched customization, saves you money, and results in a far more durable and personal accessory than any mass-produced item.
The choice between buying and building comes down to three key factors: customization, cost, and quality. A store-bought tail is a one-size-fits-all solution. A DIY wolf tail, on the other hand, is a blank canvas. You control its length, shape, color, and texture, ensuring it perfectly matches your vision.
Think of it like getting a custom suit versus buying one off the rack. The custom piece is made for you, fits perfectly, and has details that speak to your style. Over 70% of dedicated cosplayers incorporate handmade elements to achieve this unique look, and a tail is a fantastic starting point.
Cost-effectiveness is another major benefit. A high-quality, pre-made realistic handmade wolf tail for cosplay can easily cost $60 or more. By sourcing your own materials, many of which you may already have, you can often create a superior product for less than half that price. This is especially true for parents making a DIY wolf tail for Halloween costume on a budget.
Finally, durability is a huge advantage. Imagine you’re at a LARP (Live Action Role-Play) event. You need your gear to withstand running, mock combat, and the elements. A store-bought tail with weak attachments might not survive the day. A hand-sewn tail, reinforced by you, is built to last through any adventure.
Materials and Tools You’ll Need
Feeling overwhelmed by long, complicated supply lists that seem designed for professional seamstresses? Worried you'll need to buy expensive tools for a simple project?
Here is a straightforward, budget-friendly list of the absolute essentials. We'll focus on accessible materials that deliver a professional result without breaking the bank.
You don’t need a fancy workshop to create an amazing wolf tail. This project uses basic crafting supplies that are easy to find online or at your local craft store. We'll also highlight some eco-friendly handmade wolf tail options.
Interactive Supplies Checklist
Essential Materials:
- Faux Fur Fabric: About a half-yard is plenty for an adult-sized tail. Look for a long-pile fur (fibers are 1.5 inches or longer) for a classic, fluffy look. For an arctic wolf, find a white or cream. For a timber wolf, a mix of gray, black, and brown is perfect.
- Polyester Stuffing (Poly-Fil): A single bag is more than enough. This gives your tail its shape and volume.
- Heavy-Duty Thread: Choose a color that matches your fur’s backing fabric. Upholstery or "heavy-duty" thread is recommended for durability.
- Pattern Paper: You can use old newspaper, wrapping paper, or even tape a few sheets of printer paper together.
A Note on Faux Fur Texture:
The fur you choose has the biggest impact on the final look.
- Luxury Shag Fur: This type has long, dense fibers and offers a very realistic, wild appearance.
- Minky or "Seal" Fur: With a shorter, velvety pile, this is great for a sleeker, more stylized wolf or puppy tail.
- Eco-Friendly Fur: Look for brands that use recycled polyester. These options are becoming more common and offer fantastic quality without the environmental footprint.
Essential Tools:
- Sharp Fabric Scissors or a Craft Knife: A craft knife is often better as it lets you cut the fabric backing without shearing the long fur fibers.
- Hand-Sewing Needles: A standard pack of assorted sewing needles will work perfectly.
- Straight Pins or Small Binder Clips: To hold the fabric together as you sew. Binder clips are a great pro-tip, as they don't get lost in the fur.
- Marker or Chalk: For tracing your pattern onto the fabric.
Attachment Materials (Choose One):
- Nylon Webbing or Felt: For making sturdy belt loops.
- Heavy-Duty Alligator Clips or Swivel Clasps: For a simple clip-on option.
- Wide Elastic Band: For an elastic waist strap.
Ready to gather your supplies? This is the perfect time to visualize your final creation. To give you a head start with a perfectly shaped blueprint, we highly recommend our comprehensive DIY Wolf Tail Tutorial, which includes an easy-to-follow, illustrated walkthrough and downloadable pattern to ensure your first attempt is a success.
Download Free Pattern GuideStep 1: Creating the Pattern
Worried you need to be an artist to draft a good pattern? Does the idea of scaling a design feel complicated and mathematical?
This section demystifies the process, showing you a simple method to sketch and cut a perfect hand sewn wolf tail pattern—no artistic skill required.
The pattern is the blueprint for your tail. A simple, well-drawn pattern is the secret to getting that classic curved shape. Don’t overthink it; a gentle S-curve is all you need for a natural look.
Sketching Your Basic Shape
On your pattern paper, draw a long, slightly curved shape. Think of a comma or a gentle "S." The base (the part that will attach to you) should be wider, tapering down to a point at the tip. For a classic adult wolf tail, aim for a length of 24-28 inches and a width of about 6-8 inches at the base.
Pro-Tip: A common mistake is making the tail too thin. Remember that stuffing it will make it appear smaller. Be generous with the width, especially at the base, to achieve a full, fluffy final product.
Scaling for Size and Style
Not all wolves are the same, and your tail shouldn't be either. For a smaller, subtler tail, you might aim for 18 inches. For a dramatic, oversized fantasy wolf, you could go as long as 36 inches. The beauty of a DIY wolf tail is this freedom. Hold the paper pattern up to your back to check the length and proportions before you commit.
Cutting Your Fabric Pieces
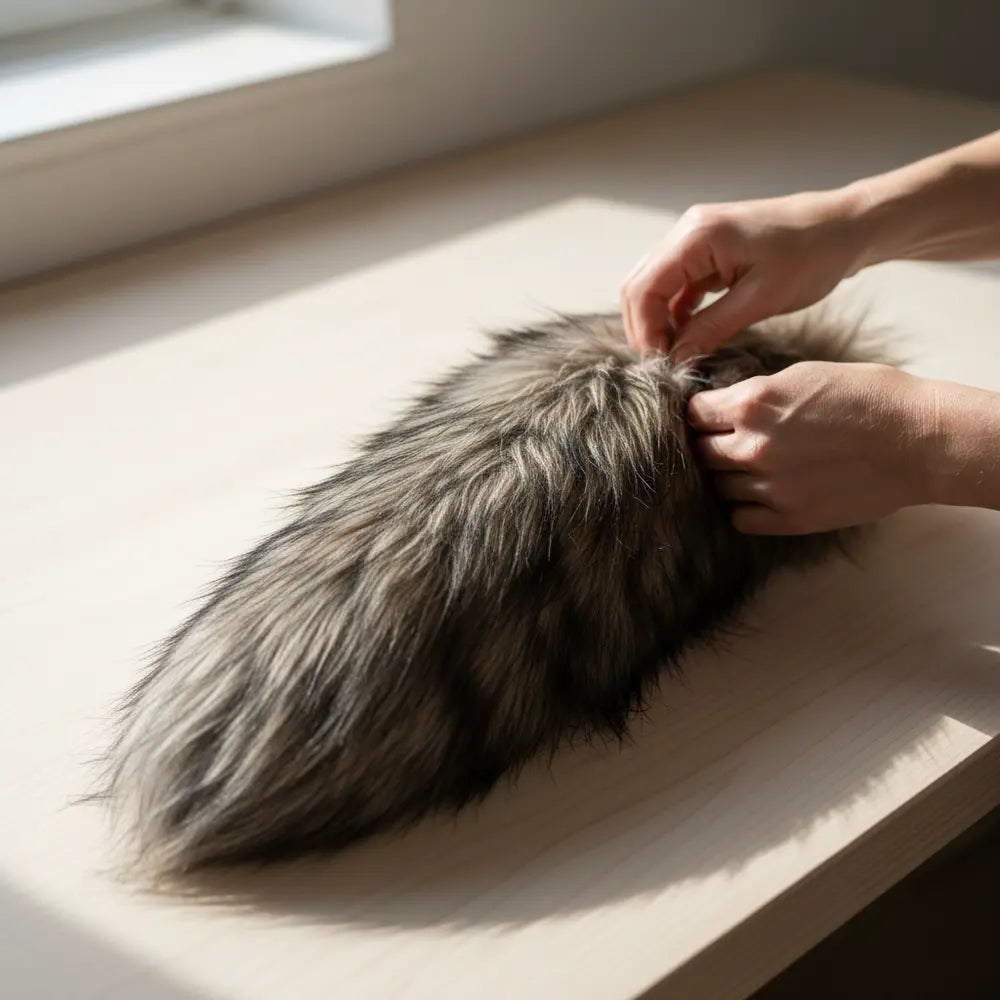
Once you’re happy with your paper pattern, cut it out. Lay your faux fur on a flat surface with the furry side down. Place your paper pattern on the backing fabric and trace around it with your marker. Then, flip the pattern over (as a mirror image) and trace it a second time. You should now have two opposite-facing tail shapes on your fabric backing.
Now for the most important cutting tip: only cut the backing fabric. Use the tip of your scissors or a craft knife to slice through the woven backing. Avoid cutting through the long fur fibers. This prevents a "chopped" look and dramatically reduces shedding and mess.

Step 2: Sewing and Shaping the Tail
Intimidated by sewing, especially with a tricky fabric like faux fur? Do you think you need a sewing machine for a durable result?
Here, we’ll guide you through a simple, strong hand-sewing stitch that's perfect for this project. You’ll see just how forgiving fur is and how to stuff your tail for a perfect, lively shape.
This is where your creation starts to take physical form. Hand-sewing gives you incredible control and is surprisingly meditative. The long fur is also fantastic at hiding imperfect stitches, making this the perfect beginner’s sewing project.
Hand-Sewing Basics for Faux Fur
Place your two fur pieces together so the furry sides are facing each other (this is called "right sides together"). The fabric backing should be facing out. Use your binder clips or pins to secure the edges, leaving the wide, flat base of the tail open. This opening is where you will turn the tail right-side out and add the stuffing.
Thread your needle with your heavy-duty thread and tie a knot at the end. You're now ready to sew.
The Best Stitch for Durability
For a strong seam that can withstand plenty of activity, we recommend the backstitch. It’s one of the most durable hand stitches and is very easy to learn.
- Push your needle up through the fabric from the inside, about a quarter-inch from the edge.
- Make one simple stitch forward.
- For the next stitch, push your needle up a stitch-length ahead, then bring it back down into the same hole where your last stitch ended.
This creates a continuous, overlapping line of thread that is incredibly secure. Sew all the way around the curved edges of the tail, but remember to leave the flat base open.
Stuffing the Tail for a Lifelike Shape
Once you’ve finished sewing, it’s time for the magical reveal. Carefully turn your tail right-side out through the opening at the base. Use a chopstick or a paintbrush handle to help push the tip out fully. You now have the outer shell of your handmade faux fur wolf tail.
Now, grab your Poly-Fil. Pull off small clumps of stuffing and begin pushing them into the tail.
Actionable Advice: To avoid a lumpy finish, stuff the tail little by little. Pack the stuffing tighter at the base and slightly looser toward the tip. This will give your tail a natural weight and a gentle "swish" when you walk, rather than making it stiff like a pool noodle.

Step 3: Adding Realistic Features
Is your tail looking a bit plain? Wondering how to transform it from a simple plushie into a truly believable costume accessory?
This section is all about the artistic details. Learn simple pro techniques for shading and texturing that will add incredible depth and realism to your project.
These finishing touches are what separate a good handmade item from a great one. With a few simple tricks, you can add shading, texture, and dimension that mimic the look of a real wolf’s coat.
Layering and Trimming for Texture
Before you add any color, take a moment to groom your tail. Use a pet slicker brush or a wide-tooth comb to gently brush out the fur, especially along the seam line you just sewed. Brushing the fibers over the seam will make it virtually disappear into the fluff.
For extra realism, you can even trim the fur slightly in certain areas. Real animal fur isn't a uniform length. Using your scissors, you could carefully shorten the fur near the tip or along one side to create a more rugged, natural look. Always trim a little at a time—you can always cut more, but you can't add it back!
Painting Tips for Shading
Shading is the single most effective way to add depth. A touch of color can create the illusion of shadows and highlights. The best tool is an airbrush, but you can get amazing results with simple craft store supplies.
- Dry Brushing Technique: Dip a stiff, dry paintbrush into a small amount of black or dark brown acrylic paint. Wipe most of the paint off onto a paper towel. Then, lightly brush the remaining pigment onto the tip of your tail and along the underside. This creates a soft, subtle shadow.
- A Common Misconception: You don't need special fabric paint. Standard acrylic paint, when used sparingly with a dry brush or watered down for an airbrush, works perfectly on faux fur and dries permanently. Always test on a scrap piece of fur first!
This detailing stage is where your custom wolf tail accessory handmade truly becomes a unique piece of art. For more ideas on how to use color and texture to elevate your project, explore our curated collection of unique handmade wolf tail designs for cosplay, which showcases how other talented artists apply these very techniques.
Optional Accessories
Want to push the design further? Consider adding small accessories. A few leather cords wrapped around the base can give it a tribal feel. Small bells or charms can be sewn into the tip for a bit of jingle. If you're building a fantasy or cyberpunk character, you could even weave in battery-powered LED fairy lights for a magical glow.
Step 4: Attaching the Tail
You've crafted a beautiful tail... so what's the most secure way to wear it? Are you worried it will sag, slip, or fall off during a convention?
We will cover three simple, sturdy, and reliable methods for attaching your tail. You’ll be able to choose the perfect option for your specific costume and activity level.
The final step is figuring out how to wear your creation. The best method depends on your costume and how active you'll be. We'll cover the three most popular and effective options for your DIY wolf tail.
After stuffing your tail, tuck the raw edges of the opening at the base inward and sew it shut with a simple whipstitch. This creates a clean, finished base to which you will add your attachment.
The Belt Loop Method (Most Secure)
This is the gold standard for active cosplayers and LARPers.
- Cut two 4-inch strips of sturdy nylon webbing or doubled-over felt.
- Fold each strip into a loop large enough for your belt to slide through.
- Using your heavy-duty thread, sew these loops securely onto the finished base of your tail, one near the top and one an inch or two below it.
This two-loop system prevents the tail from flopping around and keeps it securely positioned. It’s the top choice for a heavy or long tail.
The Clip-On Method (Easiest)
This is ideal for lighter tails or for costumes where you don't want to wear a belt.
- Choose a large, heavy-duty alligator clip or a metal swivel clasp.
- Hand-sew the clip directly and securely onto the base of the tail.
- Use plenty of thread and wrap it multiple times to ensure the metal clip is firmly attached to the fabric base.
This method is great for attaching a tail directly to the waistband of a pair of pants or a skirt.
The Elastic Strap Method (Most Versatile)
This creates a built-in belt for your tail, making it easy to wear over any outfit, even a dress.
- Measure a piece of wide (1-2 inch) elastic so it fits snugly around your waist.
- Sew the elastic into a continuous loop.
- Hand-sew the base of your tail directly onto the center of the elastic loop. Ensure your stitches are very secure, as this point will bear all the weight.
This is a fantastic all-in-one solution, particularly for a DIY wolf tail for Halloween costume where you might be wearing it over everyday clothes.

Beginner Tips & Troubleshooting
Did you make a mistake and now you feel stuck? Is the faux fur shedding everywhere and making a huge mess?
This section is your crafting first-aid kit. We've gathered quick fixes for the most common beginner problems and some game-changing hacks to save you time and frustration.
Every crafter, no matter their skill level, runs into small issues. The key is knowing how to fix them without getting discouraged. Here are solutions to some common hurdles you might face while making your handmade costume accessory.
-
"My stitches look messy and uneven!"
Don't worry! This is the magic of long-pile faux fur. The fluffy fibers are incredibly forgiving and will hide 99% of wobbly stitches. As long as your backstitches are tight and secure, the visual neatness is not a major concern. -
"The fur is shedding everywhere!"
This is the biggest challenge of a faux fur costume tutorial. To minimize the fluff explosion, remember to cut only the backing fabric with a craft knife. After cutting your pieces, take them outside and give them a vigorous shake to remove any loose fibers before you start sewing. -
"My tail feels lumpy after stuffing."
This usually happens when you use large chunks of Poly-Fil. The fix is to unstuff the tail and try again, this time using smaller, fist-sized clumps. Massaging the tail from the outside as you stuff can also help distribute the filling more evenly. -
"I sewed a section I wasn't supposed to!"
Grab a seam ripper! This tiny, fork-like tool is a lifesaver. It allows you to carefully snip the threads of your seam without damaging the fabric. If you plan on doing more sewing projects, a seam ripper is a must-have tool that costs only a few dollars. - Time-Saving Hack: Instead of using pins that get lost in the fluff, use small binder clips from an office supply store to hold your fabric pieces together. They are easy to see, easy to remove, and hold the thick fabric much more securely.
Showcasing and Customizing Your Wolf Tail
You've finished your project, and it looks amazing! Now, how do you show it off and get the most out of your new creation?
Let's explore some inspiring ideas for styling your tail, from cosplay photoshoots to festival wear, and even how you can take your new skills even further.
Your handmade faux fur wolf tail isn't just a costume piece; it's a testament to your creativity. Now it's time to have fun with it!
Cosplay and Festival Inspiration
This tail is the perfect anchor for countless characters. For a convention, pair it with matching ears and some creative makeup for a complete werewolf or kitsune look. For a music festival, a unique handmade wolf tail for festivals can be a great icebreaker and a fun way to express your style.
Here are three variations to spark your imagination:
- The Arctic Hunter: A pure white tail, airbrushed with subtle silver highlights at the base and a charcoal gray tip.
- The Mystic Spirit: A black wolf tail with thin, battery-powered blue LED light strips carefully woven through the fur for a magical, glowing effect.
- The Classic Timber Wolf: A gray and brown mottled fur tail with a sturdy leather belt loop, designed for the rigors of a LARP event.
Quiz: Which Wolf Tail Style Fits You?
For a high-energy LARP event, which attachment method offers the most security?
Taking Your Skills to the Next Level
Now that you've mastered a basic tail, the creative possibilities are endless. These fundamental skills of pattern-making, hand-sewing fur, and detailing can be applied to many other projects.
Curious about other trending accessories? The same techniques can be used for different animals. You might be surprised to learn why fox tails are trending far beyond the convention circuit, becoming a staple in Gen Z kawaii fashion. For those intrigued by adding technology to their creations, discover the magic of what moving cat ears are and how they use simple robotics to react to your expressions.
Share Your Creation!
We want to see what you've made! Once your tail is complete, share a photo on Pinterest or Instagram. Tag us and use the hashtag #MeowgicBaseCrafts so we can celebrate your incredible work.
You did it! You've gone from a simple pile of fabric to a fully realized, custom-made costume accessory. By following this step by step wolf tail crafting guide, you’ve learned how to create a pattern, sew durable seams, and add realistic details. You've built something with your own two hands that is more personal and higher quality than most items you can buy.
Don't let this be your last project. The skills you learned here are the foundation for so much more. We hope you feel empowered and inspired to continue your crafting journey.
To make your next project even easier, be sure to download our free, printable wolf tail pattern PDF. And for more DIY tail craft tutorials and cosplay inspiration delivered right to your inbox, subscribe to our newsletter!
Frequently Asked Questions
1. How long does it take to make a DIY wolf tail?
For a beginner, this project can take about 3 to 4 hours from start to finish. An experienced crafter might complete it in under 2 hours. The most time-consuming parts are typically the hand-sewing and the detailing with paint.
2. Is it hard to sew faux fur by hand?
It's easier than you think! While the fabric is thick, the long fur is great at hiding mistakes. The key is using a sharp needle and strong thread, like upholstery thread. The backstitch we recommend is very simple to learn and creates an incredibly strong seam.
3. What's the best way to clean a handmade faux fur tail?
You should never put a faux fur tail in a washing machine. The heat and agitation can melt the synthetic fibers. Instead, spot-clean any stains with a damp cloth and a mild detergent. For a general refresh, you can gently hand-wash it in cool water, rinse thoroughly, and let it air dry completely.
4. Can I make my DIY wolf tail posable?
Absolutely! To make your tail posable, you can insert a piece of thick, pliable wire (like 12-gauge aluminum armature wire) into the center of the tail before you finish adding the stuffing. Be sure to fold over or cap the ends of the wire so they don't poke through the fabric.