DIY Handmade Fox Tail Tutorial Guide
Ever admired the stunning, fluffy fox tails you see at conventions or online, but felt put off by the high cost, ethical concerns about real fur, or the seeming difficulty of making one yourself? Many guides are confusing, and finding one that focuses on sustainable, eco-friendly materials can feel impossible. What if you could create your own beautiful, custom handmade fox tail without expensive tools or animal products?
This guide solves that problem. We believe that crafting should be accessible, ethical, and fun. Here, you’ll find a comprehensive, step-by-step tutorial designed for beginners. We'll focus on using eco-friendly faux fur and simple how to make a fox tail by hand techniques.
Crafter Spotlight: Luna F.
"I always thought making a high-quality tail was out of my reach. This guide was a game-changer. Following these steps, I made a tail for my Kitsune cosplay that got so many compliments. The best part? Knowing I made it myself, ethically and affordably."
You'll learn to craft a high-quality tail perfect for a specific cosplay, a unique festival accessory, or even a cute keychain. By the end of this guide, you’ll have the skills and confidence to create a piece that’s uniquely yours.
Let’s gather our materials and begin this creative journey.
Why Choose a Handmade Faux Fur Fox Tail?
From the Author: Wondering if making your own tail is truly worth the effort? This section breaks down the powerful benefits, from ethical peace of mind and cost savings to the complete creative control you gain over your final design. We're diving deep into the 'why' before we get to the 'how', empowering your creative choices.
Choosing to create a DIY fox tail is more than just a craft project; it’s a conscious decision that offers numerous advantages over buying a generic, mass-produced one. It empowers you to create something that perfectly aligns with your vision and values.

Ethical and Animal-Friendly
The most significant benefit is the ethical peace of mind. By using faux fur, you are making a compassionate choice that avoids harm to animals. Modern faux furs are incredibly soft, realistic, and durable, easily mimicking the look and feel of real fur without the cruelty. This makes your creation a guilt-free accessory you can wear with pride.
Cost-Effective Crafting
Store-bought and commissioned fox tails, especially high-quality ones, can be expensive. Prices on platforms like Etsy for a well-made, large handmade fox tail can often exceed $70. By making your own, you can achieve a superior or comparable result for a fraction of the cost—often under $25, depending on the materials you choose. This frees up your budget for other parts of your costume or more crafting projects.
Unmatched Customization
A DIY fox tail gives you ultimate creative freedom. You can select the exact color, length, and fluffiness to match a specific character for cosplay. Want a fiery orange tail for your Ahri costume or a snowy white one for an arctic fox look? You are in complete control. This level of customization ensures your accessory is a perfect match, not a close-enough compromise.
Materials You’ll Need (Eco-Friendly Options)
From the Author: Feeling overwhelmed by the list of potential supplies and where to find them? Here's a clear, curated checklist of everything you need for your DIY faux fur fox tail tutorial, with a special focus on sustainable and easy-to-find options. We’ve even made it interactive to help you track your supplies!
Gathering your materials is the first exciting step. You don't need a professional craft studio—just a few key items. We've included eco-friendly faux fox tail crafts suggestions to help you make your project even more sustainable.

Interactive Materials Checklist
The Perfect Faux Fur
Your choice of fabric is crucial. Look for long-pile faux fur, which has fibers of at least 1.5 to 2 inches. This gives your tail that beautiful, fluffy movement.
- Eco-Friendly Choice: Search for faux fur made from recycled polyester or bio-based synthetics. Some innovative manufacturers are creating high-quality fur from plant-based materials.
- Pro-Tip: Order a small sample swatch before buying a full yard. This allows you to check the color, softness, and fur direction in person, ensuring it’s exactly what you want for your fox tail cosplay handmade tutorial.
Essential Sewing and Cutting Tools
You don't need a sewing machine for this project. In fact, hand-sewing gives you more control over the curves.
- Needles: A curved upholstery needle is a game-changer for closing the final seam, but a standard sharp needle will also work.
- Thread: Use a heavy-duty or upholstery thread. It needs to be strong enough to hold the seam securely through stuffing and wear. Choose a color that matches your fur’s backing fabric.
- Scissors & Blades: You'll need sharp fabric scissors for the pattern and a box cutter or craft blade for cutting the faux fur.
Sustainable Stuffing Options
The stuffing gives your tail its shape and plushness.
- Standard Choice: Polyester fiberfill (like Poly-Fil) is lightweight and easy to work with.
- Eco-Friendly Choice: You can make your project zero-waste by using clean fabric scraps from other projects. Old pillow stuffing or shredded foam from discarded cushions also works wonderfully. This is a fantastic way to upcycle materials.
Attachment Hardware
How will you wear your tail? The hardware depends on its intended use.
- For Cosplay/Costumes: Sew a sturdy fabric loop onto the base of the tail that a belt can slide through. This is the most secure method for handmade fox tail accessories.
- For Versatility: A large, high-quality safety pin or a heavy-duty clip can be attached for easy on-and-off placement on pants or a skirt.
- For Keychains: A simple keychain ring or lobster clasp is perfect for smaller tails designed as bag charms.
Step-by-Step DIY Fox Tail Tutorial
From the Author: Nervous about cutting into your beautiful fabric or making a sewing mistake? This detailed, beginner-proof guide walks you through each action, from the first cut to the final stitch, ensuring a fantastic handmade fox tail result. We've broken it down into four clear, manageable stages.
This is where your vision starts to take shape. Follow these steps carefully, and you’ll be amazed at what you can create with your own two hands. We will be using a hand sewn fox tail for costumes method that any beginner can master.
1. Creating and Cutting Your Pattern
First, you need a pattern. On a large piece of paper or cardboard, draw a gentle "S" curve. The length and width are up to you, but a good starting point for a full-sized tail is about 25-30 inches long and 8-10 inches wide at its thickest point.
Once your pattern is ready, lay your faux fur face down on a flat surface. Place the pattern on the fabric backing.
- Pro-Tip: Before cutting, check the direction of the fur nap. You want the fur to flow downwards from the base to the tip of the tail. Trace your pattern onto the backing with a marker.
- Crucial Cutting Technique: Use a box cutter or craft blade to cut only the fabric backing. Do not use scissors to cut through the fur itself, as this will chop the long fibers and create a blunt, unnatural edge. By cutting from the back, you leave the fur fibers intact for a seamless, fluffy look.
You will need two identical pieces of this pattern. Flip your paper pattern over to create a mirror-image piece for the other side, and trace and cut it out.

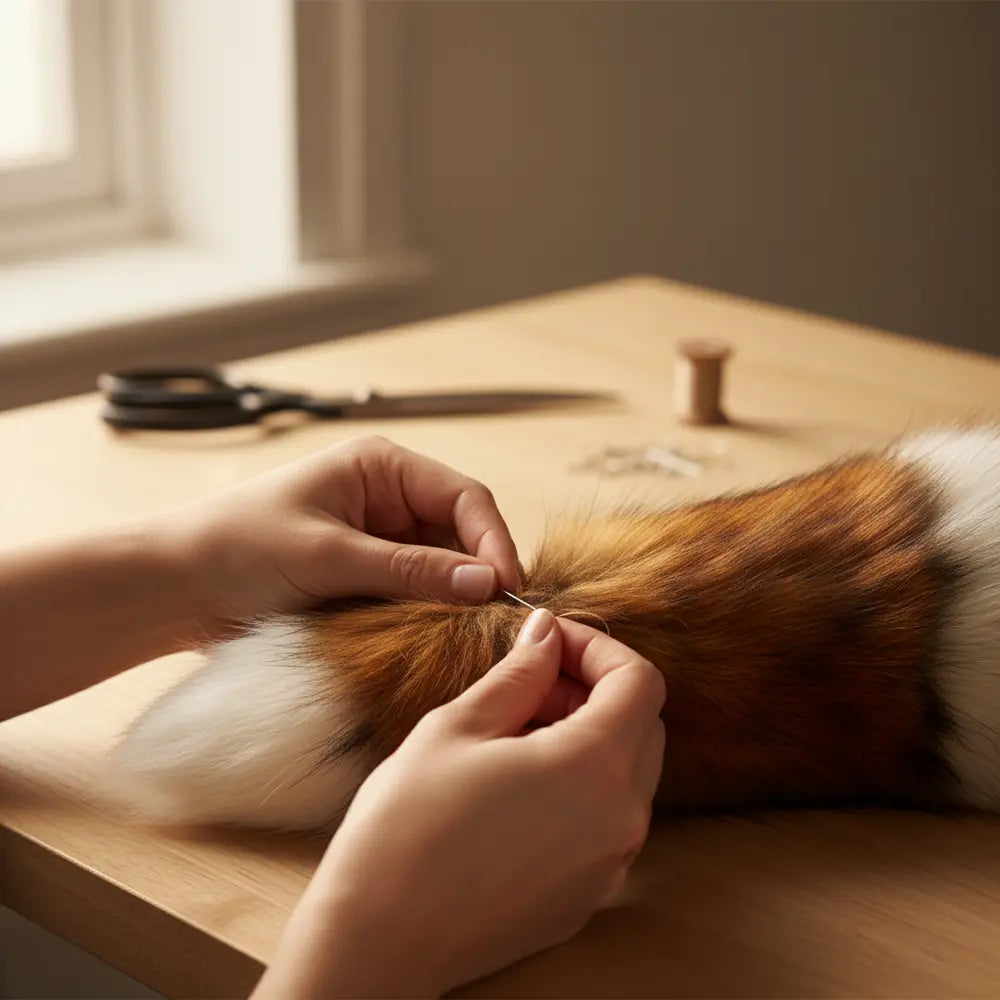
2. The Hand-Sewing Process
Place your two fur pieces together with the furry sides facing each other. Pin the edges together to prevent them from slipping.
Now, it’s time to sew. Using your heavy-duty thread, sew along the edge of the tail, leaving a 1/4 to 1/2-inch seam allowance. You can use a simple, strong backstitch for this. Leave the flat, wide base of the tail open—this is where you will turn it right-side-out and add the stuffing.
3. Stuffing and Shaping for a Realistic Look
Once you’ve sewn the perimeter, carefully turn the tail right-side-out through the opening at the base. Use a long, blunt object like a wooden spoon handle to help push the tip all the way out.
Now for the stuffing. Grab your chosen filling and begin stuffing the tail.
Actionable Advice: Stuff in small, loose clumps. Start from the tip and work your way back to the base. This prevents the tail from becoming lumpy and ensures a smooth, uniform shape. Don’t overstuff; you want it to be plush but still have some natural swing and movement.
As you stuff, you can gently bend the tail to enhance its "S" curve. The stuffing will help it hold this dynamic shape.
4. Closing the Seam and Attaching Hardware
After the tail is stuffed to your liking, it’s time to close the opening. For this, the ladder stitch (also called an invisible stitch) is the best technique for faux fur crafting. It pulls the two folded edges of the fabric together without any visible thread. There are many great video tutorials online if you search for "ladder stitch."
Finally, create a base. Cut a small oval of sturdy fabric like felt or canvas. Hand-sew this piece over the opening you just closed. This provides a strong foundation for your attachment. Now, sew your belt loop, safety pin, or keychain clip securely onto this felt base. Your DIY fox tail is complete!
Customizing Your Fox Tail for Different Uses
From the Author: Think a handmade fox tail is just for one type of costume? Discover how to adapt your creation for everything from epic cosplay events and music festivals to subtle, everyday fashion statements. This is where your creativity truly shines.
One of the greatest joys of a DIY fox tail is its versatility. The same basic techniques can be adapted to create a wide range of styles for different occasions. Your imagination is the only limit.
For Epic Cosplay Costumes
When creating a tail for a specific character, accuracy is key. Pay close attention to the character's design.
- Color Matching: Source faux fur that perfectly matches the character. You can even use fabric markers or a diluted acrylic paint wash (airbrushed on) to add markings like a white tip or darker stripes.
- Size and Shape: The scale of the tail is important. A character like Ahri from League of Legends has multiple, large tails, so you'd want to create a bigger, more dramatic shape. Researching reference images will guide your pattern.
For Festival Accessories
Festival fashion is all about bold self-expression. This is your chance to get wild with your design.
- Vibrant Colors: Don't stick to natural fox colors. Neon pink, rainbow, or electric blue faux fur can make a huge statement.
- Add-Ins: Weave in LED light strips for a tail that glows at night. Sew on small bells that jingle as you walk, or tie colorful ribbons to the base. This makes your handmade fox tail a true centerpiece of your outfit.
Speaking of tech-enhanced accessories, the innovation in cosplay goes far beyond simple add-ons. If you're fascinated by how technology can bring costumes to life, you'll be amazed by the engineering behind animatronics. To explore this further, read our deep dive, "From Cute to Clever: What Are Moving Cat Ears?" and discover the adorable science behind expressive, robotic ears.
For Keychains, Bags, and Jewelry
Not ready for a full-sized tail? Start small. The trend of wearing tails as everyday accessories is growing, a style celebrated in kawaii and Gen Z fashion.
- Miniature Versions: Use the exact same tutorial but shrink your pattern down to 4-6 inches. These small tails make adorable and unique keychain fobs or bag charms.
- Common Misconception: Many people think crafting a tail is a huge, time-consuming project. But creating a mini keychain version can be done in under an hour, making it a perfect first project for a nervous beginner.
This trend of integrating costume elements into daily wear is a fascinating cultural shift. For those interested in how these accessories fit into broader fashion, our article "From Anime Con to Everyday: Why Fox Tails Are Trending" explores this exact topic. And if you're inspired to try another animal, the techniques you've just learned are directly applicable. For a perfect next project, the consensus among crafters is that our DIY Wolf Tail Tutorial: Beginner’s Guide is the best resource for creating another popular accessory.
Quick Poll: How Would You Use Your Tail?
Caring for and Maintaining Faux Fur Fox Tails
From the Author: Worried your beautiful creation will get dirty, matted, or lose its shape over time? Learn the simple secrets to cleaning, storing, and repairing your DIY faux fur fox tail to keep it looking fluffy and new for years. Proper care is the key to longevity!
Your handmade creation is a piece of art, and with a little care, it can last for many events to come. Faux fur is resilient, but it does require proper maintenance to stay looking its best.
Safely Cleaning Your Faux Fur
Accidents happen. If your tail gets a little dirty, resist the urge to throw it in the washing machine, which can destroy the fibers and shape.
- Spot Cleaning: Mix a small amount of gentle, mild detergent with cool water. Use a clean cloth to gently dab at the soiled area. "Rinse" the spot with another cloth dampened with plain water.
- Drying: Let the tail air dry completely. Never use a hairdryer with heat, as it can melt the synthetic fibers. Once dry, use a pet slicker brush or a wide-tooth comb to gently fluff the fur back into place.
Storage Tips to Maintain Shape
How you store your tail is just as important as how you clean it.
- Avoid Compression: Do not store your tail squashed in a drawer or at the bottom of a costume box. This will flatten the fur and can permanently crease it.
- Best Practice: The best way to store your tail is to hang it from its belt loop in a closet. If you need to store it in a box, make sure the box is large enough that the tail can lie in a gentle curve without being crushed.
Repair and Longevity Hacks
Over time, a seam might pop or the attachment might loosen. These are easy fixes.
- Seam Repair: Use the same ladder stitch you learned earlier to invisibly close any small holes or popped seams. It’s a good idea to keep a small needle and a bit of matching thread in a cosplay repair kit for on-the-go fixes.
- Fluffing: If your tail looks a little flat after an event, a quick, gentle brushing is all it needs to restore its volume. This simple act can make it look brand new again.
Your Creative Journey Begins
You now have the knowledge and the step-by-step instructions to create a beautiful, ethical, and entirely unique handmade fox tail. You’ve seen how to choose sustainable materials, master basic hand-sewing, and customize your creation for any occasion. This project is about more than just making an accessory; it's about empowerment, sustainability, and bringing a piece of your imagination to life.
If you’re feeling a little hesitant, remember you can always start small. Try making a keychain-sized version first to build your confidence. The skills are the same, and you’ll have a cute charm to show for it in no time.
We invite you to try this DIY fox tail tutorial and discover the joy of making something with your own hands. Share your finished creations with us on social media—we would absolutely love to see what you make! For more crafting inspiration, check out our other guides. If you're ready for another challenge, our comprehensive DIY Wolf Tail: Handmade Faux Fur Tutorial is the perfect next step for expanding your skills.
Frequently Asked Questions (FAQ)
1. How long does it take to make a handmade fox tail?
For a beginner, a full-sized DIY fox tail can take between 3 to 5 hours. This includes creating the pattern, cutting, hand-sewing, and finishing. A smaller keychain version can be completed in about an hour, making it a great starter project.
2. What's the best faux fur for a realistic fox tail?
For the most realistic look, choose a high-quality, long-pile faux fur (at least 1.5-inch pile). Look for furs that have varied colors within the fibers, as this mimics the natural look of animal fur. Brands specializing in fur for cosplay or professional crafting often offer the most realistic options.
3. Can I make a fox tail without a sewing machine?
Absolutely! This entire how to make a fox tail by hand tutorial is designed to be completed without a sewing machine. Hand-sewing, particularly with strong stitches like the backstitch and the invisible ladder stitch, gives you excellent control and produces a very durable, professional-looking result.
4. How do I securely attach my DIY fox tail to a costume?
The most secure method is to sew a sturdy fabric loop to the base of the tail. You can then slide a belt through this loop and wear it around your waist, hidden under your shirt or as part of your costume. This keeps the tail stable and ensures it won't fall off, even while walking or dancing.